
Introduction
Ever wondered how to transform your walls into a masterpiece? Look no further!
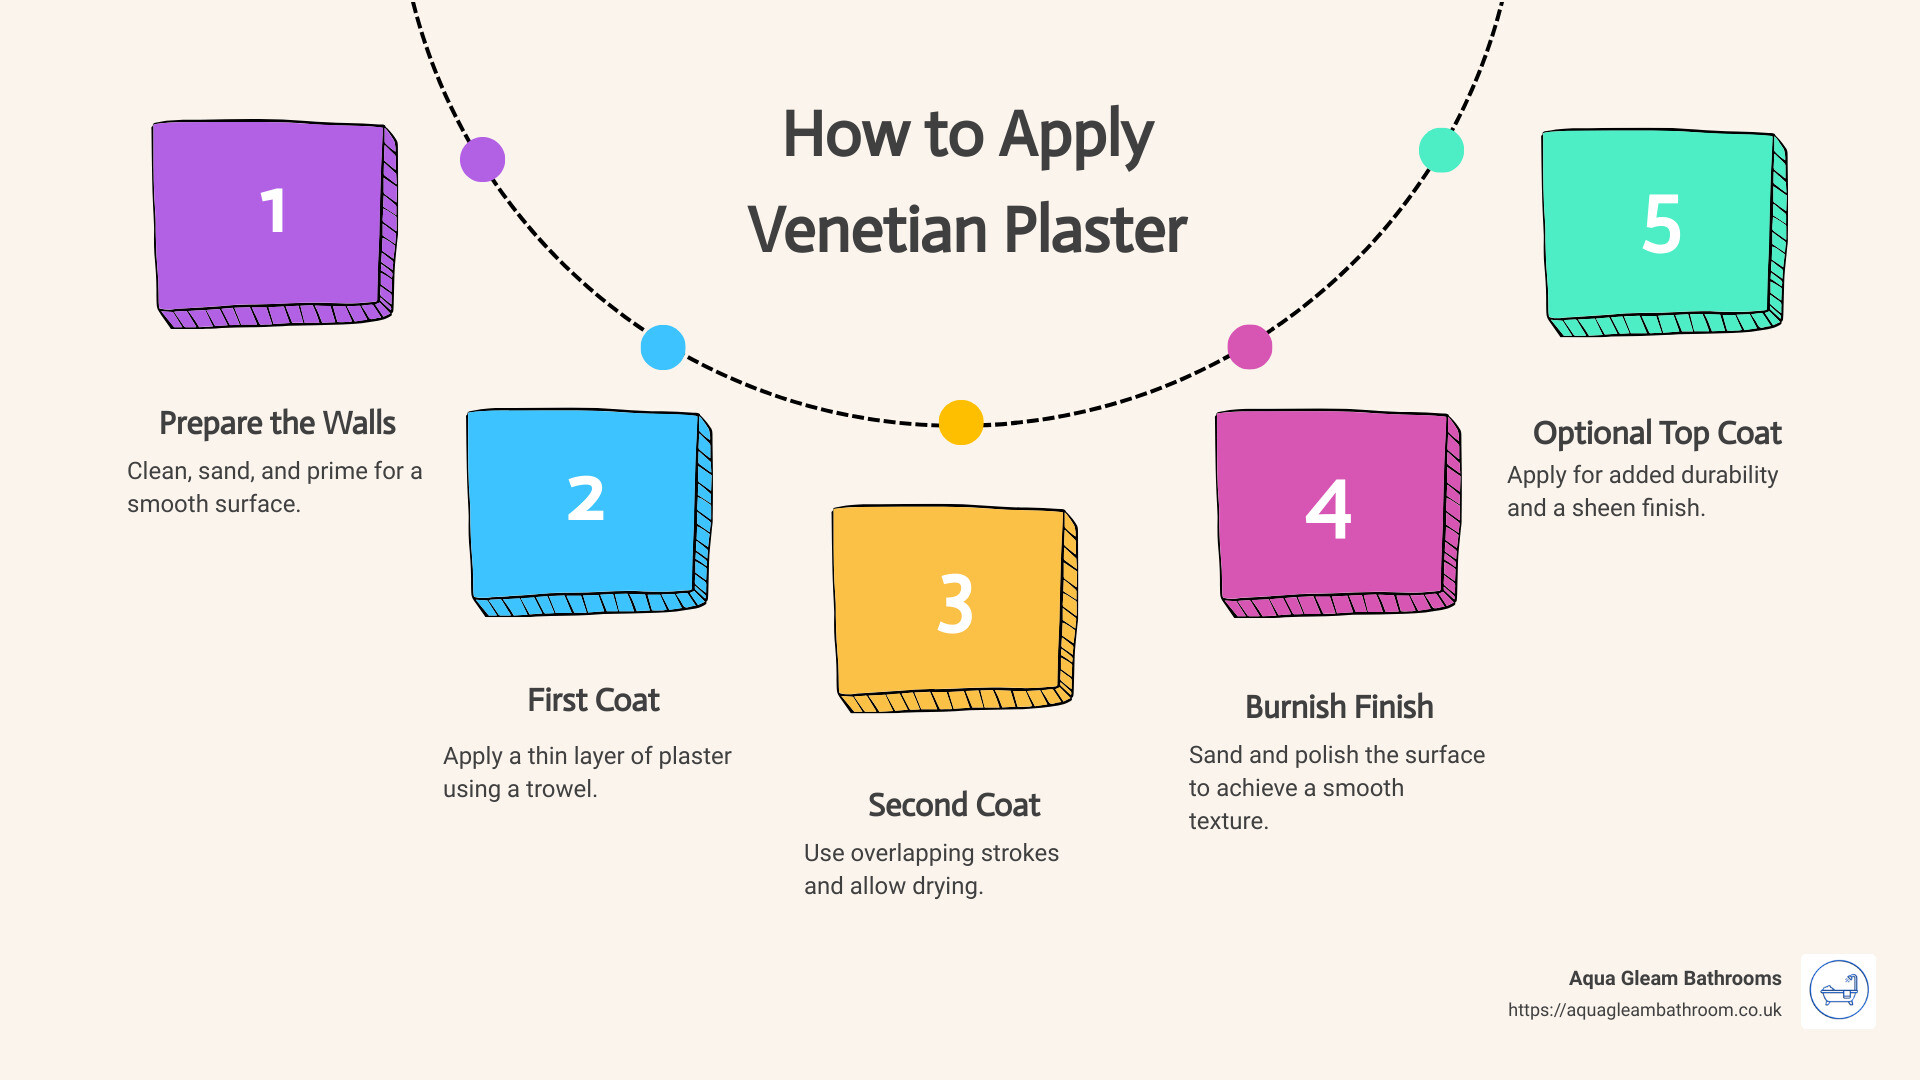
If you’re eager to learn how to apply Venetian plaster, here’s a quick overview:
- Prepare the Walls: Clean, sand, and prime.
- Apply the First Coat: Thin plaster layer with a trowel.
- Apply the Second Coat: Overlapping strokes, allow to dry.
- Burnish the Finish: Sand and polish for smooth texture.
- Optional Top Coat: Apply for extra durability and sheen.
Now, let’s dive deeper into why Venetian plaster is a timeless choice for homeowners looking to add a touch of elegance to their space.
Venetian plaster has a rich history dating back to ancient Rome. The technique, perfected during the Renaissance in Venice, mimics the natural, luxurious look of stone. This artisan project involves applying a stucco-like surface coating, resulting in walls that resemble polished marble, full of depth and texture.
Ideal for homeowners who appreciate fine craftsmanship, Venetian plaster not only elevates aesthetic appeal but also provides a durable and long-lasting finish. Whether you’re updating your bathroom or giving your kitchen a fresh look, this technique ensures that your walls become a stunning focal point.
What You Need to Know Before Applying Venetian Plaster
Essential Tools and Materials
Before you dive into your Venetian plaster project, you need to gather the right tools and materials. Here’s a quick checklist:
- Steel Trowel: Essential for applying and smoothing the plaster.
- 4- to 6-inch Drywall Knife: Useful for smaller areas and detailed work.
- Venetian Plaster: The star of the show, available in quart or gallon buckets.
- 400- to 600-grit Sandpaper: For burnishing the plaster to achieve a smooth finish.
- Painting Primer: Necessary for prepping bare drywall.
- Drop Cloth: To protect your floors from splashes and spills.
- Work Gloves, Eye Protection, and Breathing Protection: Safety first! These items protect your skin, eyes, and lungs.
Preparing Your Walls
Proper preparation ensures a flawless finish. Here’s how to get your walls ready:
-
Cleaning: Start by clearing the room and spreading a drop cloth on the floor. Clean the walls to remove any dirt, grease, or dust. A clean surface is crucial for the plaster to adhere properly.
-
Priming: If you’re working with bare drywall, apply a coat of flat wall paint or primer. This step creates a good base for the plaster. Use a paintbrush and roller for even coverage.
-
Sanding: Inspect your walls for any cracks or holes. Fill them in and sand the surface smooth. Lightly sand glossy paint surfaces to remove the sheen, ensuring better adhesion for the plaster.
How to Apply Venetian Plaster
Applying the First Coat
-
Start at a Corner: Begin in a corner of the room. Use a flexible steel trowel or a 4- to 6-inch-wide drywall knife.
-
Angle Techniques: Hold the trowel at a 15- to 30-degree angle to the wall. This helps spread the plaster evenly.
-
Coverage Tips: Apply a thin coat of Venetian plaster. Use strokes that vary in length and angle. This creates a natural, textured look.
-
Keep it Thin: Ensure the coat is thin. Thick layers can crack and take longer to dry.
-
Let it Dry: Allow the first coat to dry completely. This usually takes about 24 hours.
Applying the Second Coat and Finishing Touches
-
Angle Adjustments: For the second coat, hold the trowel at a 60- to 90-degree angle. This provides better coverage and a smoother finish.
-
Overlapping Strokes: Use overlapping (X-shaped) strokes. This ensures a thorough and even application.
-
Thin Layer Again: Apply another thin layer of plaster. Consistency is key for achieving a professional look.
-
Drying Time: Let the second coat dry for at least 24 hours before moving to the next step.
-
Burnishing: Once dry, burnish the surface with 400- to 600-grit sandpaper using a circular motion. This step gives the plaster its signature smooth, iridescent finish.
-
Polishing: To enhance the polished look, rub the surface with the flat side of a clean trowel or putty knife.
-
Optional Top Coat: For added sheen and protection, apply a Venetian plaster topcoat or paste wax. Trowel it on and burnish it just like the plaster.
By following these steps, you’ll achieve a stunning, marble-like finish with Venetian plaster. In the next section, we’ll explore advanced techniques and tips to elevate your plastering skills.
Advanced Techniques and Tips for Venetian Plaster
Creating Textures and Effects
Venetian plaster is not just about a smooth finish. You can create artistic effects by varying your application techniques.
X-Shaped Strokes: Use overlapping X-shaped strokes for a dynamic texture. This technique adds depth and a sense of movement.
Circular Motions: Circular motions can give your wall a softer, more organic look. Use these motions when applying your final coat for a unique finish.
Layering: Apply multiple thin layers to build up texture. Each layer should be allowed to dry before adding the next. This technique creates a rich, multi-dimensional surface.
Tool Tips: Steel trowels and drywall knives can leave lines and scratch marks. To avoid this, round the corners of your tools with 100-grit sandpaper. This ensures smoother application.
Customizing Your Color
Customizing the color of your Venetian plaster can make your walls stand out. Here are some tips on tinting techniques and color mixing.
Tinting Techniques: If you’re adding your own tint, mix small batches with different quantities of colorants. Keep notes on each mix until you find the right shade. This method allows for a wide range of color options, far more than pre-tinted products.
Test Batches: Always create test batches before committing to a color. Apply these to scrap drywall or an inconspicuous area. This helps you see how the color looks when dry and under different lighting conditions.
Layering Colors: You can layer different colors for a more complex finish. Apply a base color and then a slightly different shade on top. This creates a subtle, yet striking effect.
Mix Thoroughly: Make sure to mix the Venetian plaster thoroughly before each use. This ensures even color distribution and a consistent finish.
By mastering these advanced techniques, you can transform your walls into works of art. Up next, we’ll discuss how to care for your newly plastered walls to ensure they remain stunning for years to come.
Caring for Venetian Plaster Walls
Protective Top Coats
Maintaining your Venetian plaster walls is essential to preserve their beauty and longevity. Here’s how to keep them looking stunning:
Maintenance
Regular maintenance is simple. Dust the walls with a soft cloth or a feather duster to keep them free from dirt. Avoid using harsh chemicals or abrasive cleaners, as they can damage the finish.
Cleaning
For a deeper clean, use a damp cloth. Gently wipe the walls, avoiding excessive moisture. If you encounter stubborn stains, a mild soap solution can be used. Always test in a small, inconspicuous area first.
Longevity
Venetian plaster is durable, but adding a protective top coat can extend its life, especially in high-traffic areas or rooms with high moisture, like bathrooms. A top coat not only enhances the sheen but also adds a layer of protection.
Paste Wax
Paste wax is a popular choice for a top coat. It provides a subtle, natural shine and helps protect the plaster from moisture and stains.
Application Method:
1. Apply with a Trowel: Use a clean trowel to apply a thin, even layer of paste wax.
2. Buff the Surface: Once the wax is applied, buff the surface with a soft cloth to bring out the shine.
Clear Coatings
Clear protective coatings are another option. These are specifically made for Venetian plaster and can slightly darken the color, adding depth.
Application Method:
1. Use a Trowel: Apply the clear coating with a trowel, just like the plaster.
2. Burnish: After it dries, burnish the surface with the flat side of a clean trowel to enhance the sheen.
By following these steps, you can ensure your Venetian plaster walls remain beautiful and protected for years to come.
Next, let’s dive into some frequently asked questions about Venetian plaster to clear up any lingering doubts.
Frequently Asked Questions about Venetian Plaster
Is Venetian Plaster Difficult to Apply?
Skill Level: Applying Venetian plaster is not as difficult as it seems, but it does require some practice. The key is to get comfortable with the tools and techniques. Practicing on scrap drywall can help.
DIY Feasibility: Yes, it’s feasible for a DIY project. Just be prepared for a learning curve. Many find it rewarding and enjoy the artistic aspect of it.
Artistic License: Venetian plaster allows for a lot of creativity. You can create various textures and finishes, making it a unique project.
Can Venetian Plaster Be Applied on Any Surface?
Suitable Surfaces: Venetian plaster can be applied to most wall surfaces, including drywall, plaster, and even glossy paint (if sanded first).
Surface Preparation: Proper preparation is crucial. Clean the walls, fill any cracks, and sand glossy surfaces to ensure good adhesion.
Adaptability: This plaster is very adaptable and can be used in various rooms, from living areas to bathrooms. Just remember, in high-moisture areas, a topcoat is recommended for added protection.
Does Venetian Plaster Need a Base Coat?
Base Coat Importance: Yes, a base coat is essential, especially on bare drywall. It ensures better adhesion and a smoother finish.
Application Tips: Use a flat wall paint or primer as your base coat. Make sure it’s completely dry before applying the plaster.
Enhanced Effects: A well-applied base coat can enhance the final look, making the plaster appear more vibrant and polished.
Venetian vs. Regular Plaster
Material Composition: Venetian plaster is made from slaked lime putty mixed with crushed marble, giving it a unique sheen. Regular plaster doesn’t have this marble content and lacks the same finish.
Visual Appeal: Venetian plaster has a polished, marble-like appearance that regular plaster cannot mimic. It creates a sense of depth and texture.
Color Options
Pre-Tinted vs. Custom Tinting: Some Venetian plaster products come pre-tinted, but you can also add your own universal colorants. Custom tinting offers more color choices.
Experimentation: Mix small batches with different amounts of colorant to find the perfect shade. Keep notes on your mixes for consistency.
VOC Content
Natural Materials: Most Venetian plaster is made from natural materials and is non-toxic, containing no VOCs. This makes it a healthier option for indoor air quality.
Check Labels: Always check the product label to ensure there are no added polymers or additives that might contain VOCs.
By understanding these key points, you can tackle your Venetian plaster project with confidence and creativity.
Conclusion
At Aqua Gleam Bathrooms, we believe in transforming spaces with high-quality workmanship and meticulous attention to detail. Our team of skilled artisans excels in applying Venetian plaster, ensuring that every project is completed to the highest standards.
Why Choose Aqua Gleam Bathrooms?
We understand that applying Venetian plaster is not just a task; it’s an art form. Our craftsmen are trained to handle every step of the process with precision, from preparing the walls to the final burnishing. This ensures a flawless, marble-like finish that adds depth and texture to your walls.
Attention to Detail
Every detail matters when it comes to Venetian plaster. We take the time to round off the corners of our tools to prevent scratch marks and mix the plaster thoroughly before application. Our team is also adept at customizing colors to match your vision, ensuring a unique and personalized finish.
High-Quality Workmanship
Using only the finest materials and the latest techniques, we guarantee that your Venetian plaster walls will not only look stunning but also last for years to come. Our commitment to quality extends to every aspect of our work, from the initial consultation to the final protective topcoat.
Transform your walls with the timeless elegance of Venetian plaster. Trust Aqua Gleam Bathrooms to bring your vision to life with our expert services.
Contact us today for a free consultation and quote.
