

Introduction
Ever find yourself staring at your kitchen cabinets wishing for a bright, sleek, or simply refreshed look? Then you’re in the right place! Cabinets form the heart of your kitchen’s aesthetic, framing the space and often dictating the rest of your décor. The issue can be, kitchen renovations often seem daunting, cumbersome, and heavy on the wallet. But what if we told you that a stunning makeover could be achieved with a little DIY courage and less than an hour of your time? With ‘do it yourself’ endeavor, or as we call it – ‘diy redo kitchen cabinets’, you can completely transform your kitchen cabinets and breathe new life into your kitchen decor.
Here at Aqua Gleam Bathrooms, we understand that the kitchen is an integral part of any home—it’s a hub of activity, a gathering spot, and a place where memories are made. And while kitchen cabinets play a crucial role in the overall feel and function of the room, we know that a complete renovation is not always feasible nor necessary. That’s why we’ve crafted this article, to guide you through a straightforward DIY process that will help streamline your kitchen revamp, leaving you with stunning, refreshed cabinets.
Quick Overview:
- Step 1: Understand the Basics of Kitchen Cabinets
- Step 2: Gear Up – Tools and Materials
- Step 3: Prepping Cabinets
- Step 4-5: Paint and Prime
- Step 6-7: Reinstating Hardware and Cabinet
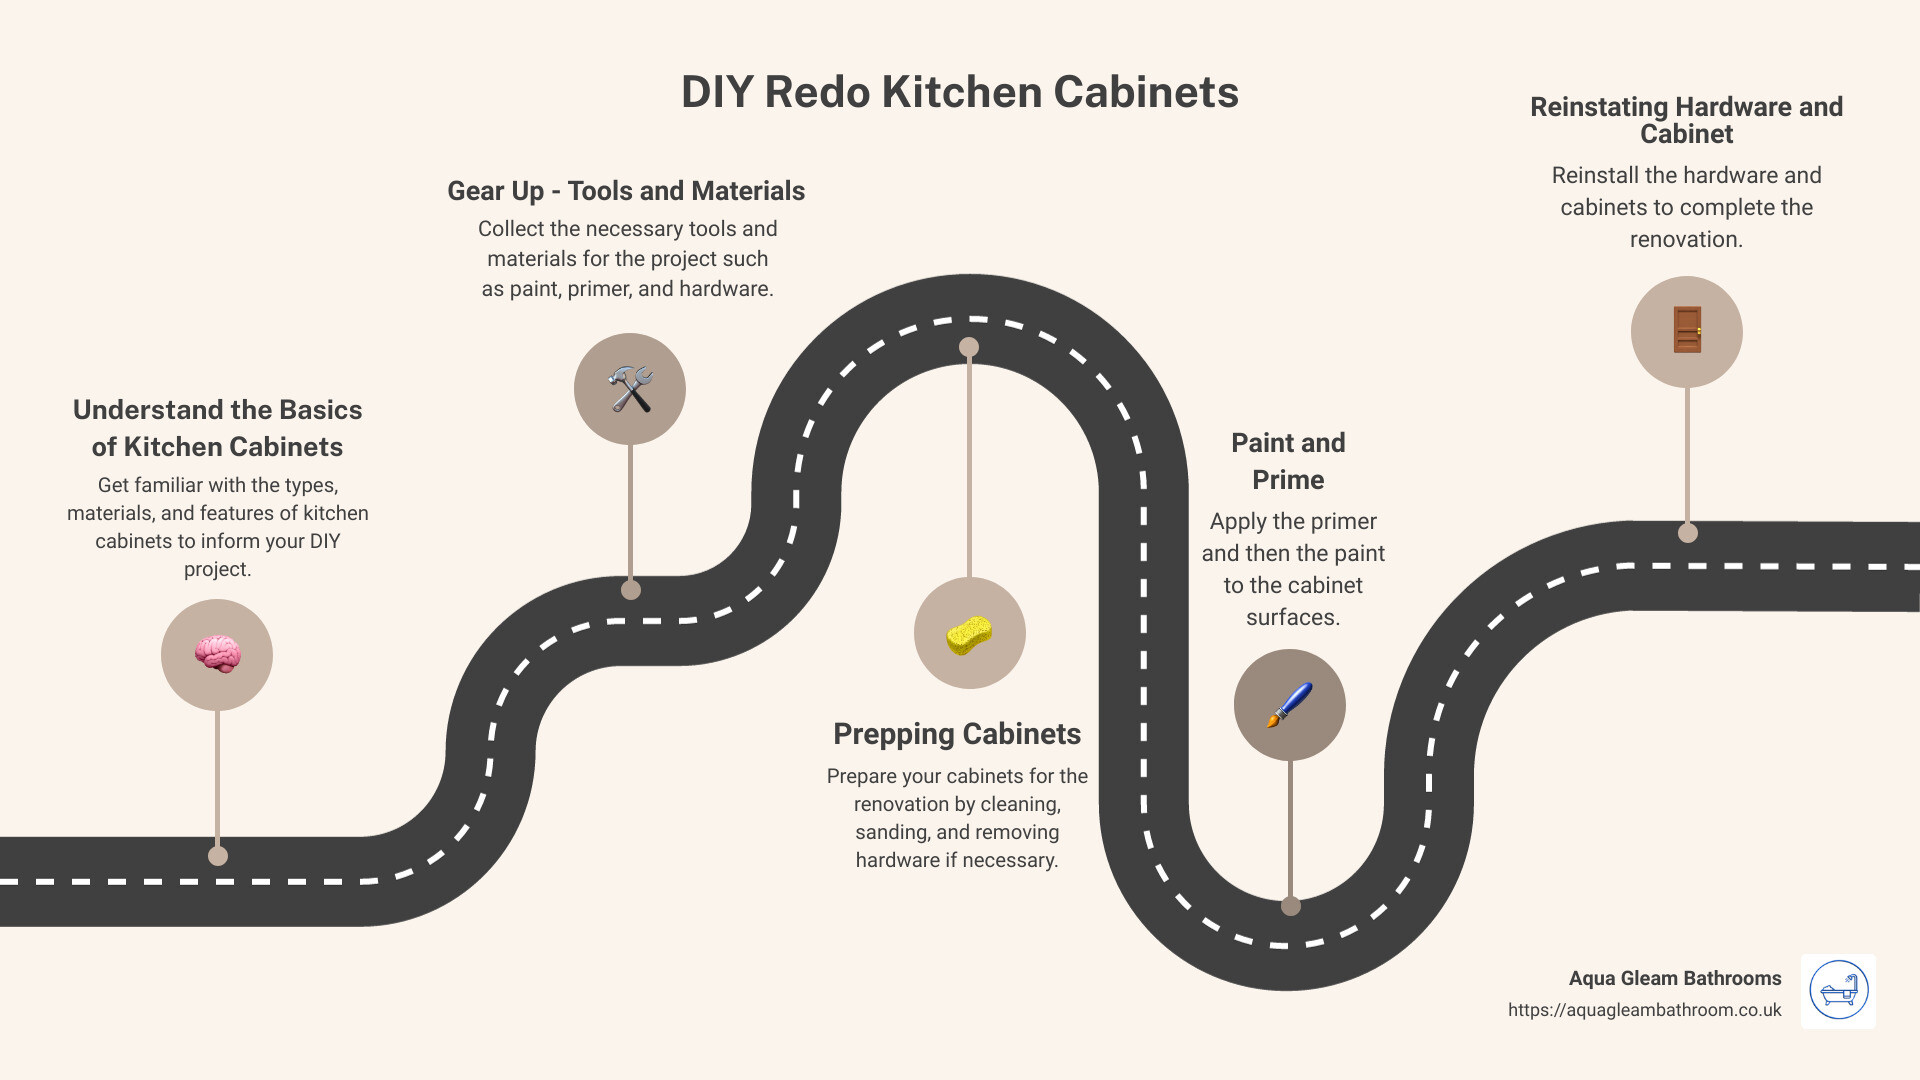
This transformation can be achieved by following a few simple steps and techniques. Before we delve into the detailed process, let’s take a quick snapshot overview of what your DIY journey will entail. Here’s to creating a kitchen you love—one cabinet at a time.
Understanding the Basics of Kitchen Cabinets
When it comes to kitchen remodelling, cabinets play a pivotal role not just in functionality, but also in shaping the overall aesthetics of your kitchen. Whether you’re considering minor updates or a complete overhaul, understanding the basics of kitchen cabinets is the first step.
Brief Explanation of Different Types of Kitchen Cabinets
Typically, kitchen cabinets fall into three primary categories:
-
Base Cabinets: These are the workhorses of kitchen storage, providing a countertop surface and housing items like cookware, utensils, and various appliances.
-
Wall Cabinets: Installed directly onto your kitchen walls, these are perfect for storing lighter items like dishes, glassware and pantry items. They can be designed with various levels to maximize space.
-
Tall Cabinets: Also known as pantry cabinets, these extend from floor to ceiling and offer a substantial amount of storage space. They’re ideal for storing food items, larger kitchen gadgets, and cleaning supplies.
The type of cabinet you choose largely depends on your kitchen’s layout and your specific storage needs. Each type has its own functionality and contributes differently to the overall kitchen aesthetic.
Importance of Choosing the Right Style for Your Kitchen
Choosing the right style for your kitchen is much more than a mere home improvement project. It’s a strategic investment that can enhance your home’s aesthetic appeal, increase its market value, and elevate your quality of life. Your choice of style can be influenced by various factors, including your personal preference, the overall theme of your home, and even the amount of natural light your kitchen receives.
For instance, if you’re aiming for a classic kitchen design, you might consider adding bun feet and turned legs to your base cabinets. Or if you’re more inclined towards a modern look, installing metal feet on your cabinets can give your kitchen that sleek finish.
In kitchen cabinets, there’s a wide spectrum of styles and designs to choose from. From the shaker style, which is characterized by its classic and simplistic look, to the flat-panel or slab style which offers a clean and uncluttered appearance perfect for contemporary or modern kitchens.
The style of your cabinets can dramatically impact the overall look and feel of your kitchen. So, take your time to choose a style that not only complements your kitchen but also aligns with your personal taste.
In the next section, we’ll guide you through the process of preparing for your DIY kitchen cabinet redo. Keep in mind that every successful DIY project starts with a solid plan and the right tools. So, let’s get started on your kitchen transformation journey.
Stay tuned for the step-by-step guide on how to give your kitchen cabinets a brand new look!
Preparing for Your DIY Kitchen Cabinet Redo
Before diving into the process of redoing your kitchen cabinets, have the right tools and materials. Having everything at hand not only makes the process smoother but also ensures you get the best results.
Tools and Materials Needed for a DIY Kitchen Cabinet Redo
As with any DIY project, the first step to redoing your kitchen cabinets is to gather all the necessary tools and materials. Here’s a list of what you’ll need:
- Screwdriver or drill: To remove and reinstall the cabinet doors.
- Sandpaper and/or electric sander: To smooth down the surfaces of the cabinets before painting.
- Paint primer: To ensure the paint adheres properly to the cabinets.
- Paint: Choose a color that matches your kitchen’s aesthetics. You can also consider using a high-gloss finish for a modern look and easy cleaning.
- Paintbrushes and rollers: For applying the primer and paint.
- Painter’s tape: To protect areas you don’t want to be painted.
- Drop cloths: To protect your floors and countertops from paint.
- New hardware (optional): If you want to completely change the look of your cabinets, new knobs and pulls can make a big difference.
It’s also worth considering a crackling glaze or other faux finishes to give your cabinets a unique look, as suggested by This Old House in the research above.
Safety Precautions to Consider Before Starting the Project
Safety should always be your priority when undertaking any DIY project. Here are a few precautions to keep in mind as you embark on your kitchen cabinet redo:
- Protect your eyes: Wear safety goggles to protect your eyes from dust and paint.
- Ventilate your space: Ensure your kitchen is well-ventilated during the painting process to avoid inhaling paint fumes.
- Be careful with tools: Always use tools properly and follow safety guidelines. If you’re unsure about how to use a tool, seek professional advice.
- Keep your workspace clean: A clean workspace is a safe workspace. Keep your tools organized and clean up any spills immediately to prevent accidents.
If you feel uncertain about any part of the process, or if the project becomes too overwhelming, don’t hesitate to seek professional help. At Aqua Gleam Bathrooms, we offer a comprehensive range of services to assist you with your kitchen renovation needs.
Now that you’re equipped with the right tools, materials, and safety knowledge, you’re ready to start your DIY kitchen cabinet redo project. In the next section, we’ll guide you through the step-by-step process of giving your kitchen cabinets a brand new look.
Step-by-Step Guide to Redoing Your Kitchen Cabinets
Turning an outdated kitchen into a stylish and functional space doesn’t have to be a daunting task. With a bit of elbow grease and creativity, a DIY redo of your kitchen cabinets can be accomplished in less than an hour of active work per cabinet. Here’s a step-by-step guide to help you navigate through the process.
Step 1: Removing the Old Kitchen Cabinets
The first step in your DIY redo kitchen cabinets project is to remove the old kitchen cabinets. Start by emptying all the contents of your cabinets to prevent any damage. Next, carefully unscrew the hinges and handles, keeping all the hardware in a safe place for later use. Remember to label each cabinet and its corresponding door to make reinstallation easier.
Step 2: Cleaning and Preparing the Cabinets for a Makeover
Once the cabinets are removed, clean them thoroughly using a mild detergent to remove any grease or dust. After cleaning, lightly sand the surface of the cabinets. This helps the new paint adhere better and results in a smoother finish.
Step 3: Choosing the Right Paint and Primer for Your Cabinets
The next step is choosing the right paint and primer for your cabinets. For a long-lasting finish, select a durable paint specifically designed for kitchen use. Light shades can brighten up the room, while darker hues can create a dramatic transformation. Don’t forget to apply a layer of primer before painting to ensure the paint sticks well and lasts longer.
Step 4: Painting the Cabinets
Now comes the fun part – painting the cabinets! Use a small roller for large flat areas and a brush for corners and edges. Apply two to three coats of paint for a solid finish, allowing sufficient drying time between each coat. For a unique touch, consider using chalk paint, which can add character and functionality to your kitchen cabinets.
Step 5: Adding New Hardware to the Cabinets
A simple and budget-friendly way to update your kitchen cabinets is by changing the hardware. Choosing some beautiful cabinet pulls can instantly refresh the look of your cabinets. You could also consider swapping out dated drawer pulls for cup pulls for a more modern or farmhouse feel.
Step 6: Reinstalling the Cabinets
Once the paint has dried and you’ve added the new hardware, it’s time to reinstall the cabinets. Refer back to your earlier labels to ensure each door matches its original cabinet. Once everything is aligned properly, screw the hinges back on and take a step back to admire your newly redone kitchen cabinets!
Redoing your kitchen cabinets is a process that requires patience and creativity. Don’t worry if things don’t turn out perfect the first time – the beauty of paint is that it’s easy to change. So roll up your sleeves, grab your paintbrush, and start transforming your kitchen today!
If you need more inspiration for your kitchen renovation, explore our other blog posts on Aqua Gleam Bathrooms. We’re here to help you create the kitchen of your dreams!
Additional Tips for a Successful Kitchen Cabinet Redo
After you’ve put in the hard work of painting and reinstalling your cabinets, it’s time to add those final touches that can take your DIY redo kitchen cabinets project from good to great. Here are a few additional tips to ensure your kitchen cabinet redo is a success:
Choosing the Right Color Scheme for Your Kitchen Cabinets
The color of your kitchen cabinets can dramatically change the overall look and feel of your kitchen. If you’re aiming for a modern look, consider a sleek, monochromatic color scheme. On the other hand, if you’re after a more classic, farmhouse-style kitchen, opt for soft, neutral tones. Don’t be afraid to experiment with colors. For example, painting your lower cabinets a darker color and keeping your upper cabinets light can create a beautiful, contrasting look. The color you choose should complement the rest of your kitchen’s decor and reflect your personal style.
Incorporating Unique Design Elements Like Glass Inserts or Open Shelving
Adding unique design elements can give your kitchen cabinets a custom, high-end look. For instance, consider replacing some of your cabinet doors with glass inserts. This not only adds visual interest but also allows you to show off your favorite dishes or glassware.
Alternatively, you might want to try incorporating open shelving. Open shelves can make your kitchen feel more spacious and inviting. They provide a perfect spot to display your favorite kitchen gadgets or decor items. Just keep in mind that items on open shelves are exposed, so they need to be organized and kept clean.
Extending Upper Cabinets to the Ceiling for a More Finished Look
If you want your kitchen to look taller and more finished, consider extending your upper cabinets to the ceiling. This not only provides additional storage space but also draws the eye upward, creating the illusion of a higher ceiling. Plus, it eliminates the dust-collecting space between the top of your cabinets and the ceiling.
Making over your kitchen cabinets is a significant project, but the result can dramatically improve the look and functionality of your kitchen. Plus, it’s a project you can be proud of. So why wait? Start planning your DIY redo kitchen cabinets project today, and don’t hesitate to reach out to us at Aqua Gleam Bathrooms if you need any help or advice. We’re here to make your kitchen makeover as easy and enjoyable as possible!
Maintaining Your Newly Redo Kitchen Cabinets
After you’ve successfully completed your DIY redo kitchen cabinets project, the next crucial step is ensuring they stay in top shape. Here are some tips to keep your hard work looking great for years to come.
Tips for Cleaning and Maintaining Your Kitchen Cabinets
-
Regular Cleaning: Dust and wipe down your cabinets at least once a week. Use a soft, damp cloth and mild cleaner to keep the surfaces clean and fresh.
-
Avoid Moisture Damage: Kitchens often encounter steam and spills. Dry any wet areas immediately to prevent water damage or swelling in your cabinets.
-
Handle with Care: Always use the handles when opening and closing cabinet doors to keep the paint or stain from wearing off.
-
Regular Touch-ups: Even with careful use, your cabinets might get minor scratches or chips over time. Having some leftover paint or stain on hand for quick touch-ups can keep your cabinets looking new.
When to Consider Professional Help for Kitchen Cabinet Maintenance
While regular cleaning and maintenance can prolong the life of your cabinets, there might be situations when professional help is necessary. If you notice problems like sagging shelves, faulty hardware, or significant water damage, it’s best to call in a professional.
At Aqua Gleam Bathrooms, we not only help you create your dream kitchen but also ensure it stands the test of time. Whether it’s a minor repair or a major redo, our team of professionals can help you maintain your kitchen in its best shape.
A well-maintained kitchen is not only aesthetically pleasing but also adds value to your home. So, don’t overlook the importance of cabinet maintenance in your kitchen’s overall appeal.
In conclusion, DIY redoing your kitchen cabinets can be a rewarding project. And with regular maintenance and occasional professional help, you can enjoy your newly redone cabinets for many years. Up next, we’ll recap the steps involved in a DIY kitchen cabinet redo and offer a final bit of encouragement for your kitchen redo journey.
Conclusion
In this guide, we’ve provided a step-by-step breakdown of the process to DIY redo kitchen cabinets. We started with essential preparation, including gathering the necessary tools and equipment, and taking safety precautions. We then moved onto the actual renovation steps, from removing the old cabinets and preparing them for a makeover, to painting the cabinets and adding new hardware. Finally, we have also touched on some additional design tips and maintenance advice to ensure the longevity of your kitchen cabinet makeover.
This DIY project may seem daunting initially, but with the right tools, a good plan, and a dash of creativity, you can transform your kitchen cabinets in less than an hour. It’s not just about the destination, but also the journey. The process of redoing your kitchen cabinets can be a rewarding experience, giving you a sense of accomplishment and a kitchen that you can truly call your own.
In the end, your efforts will result in a kitchen that not only looks fabulous but also meets all of your needs. So don’t hesitate, grab your DIY hat, and let your creative juices flow. You’re now well-equipped to embark on your kitchen cabinet redo project!
For more information on kitchen renovations, or if you need professional help, check out our kitchen remodelling services at Aqua Gleam Bathrooms. For those looking to explore more design ideas and trends, our blog post on creative kitchen designs for small rooms is a must-read.
Whether you’re embarking on a DIY project or planning a full-scale kitchen remodel, we’re here to assist you every step of the way. Good luck with your DIY kitchen cabinet redo journey!
