
Introduction
Have you ever wondered how to plumb a bath in successfully? It’s a task that might seem daunting at first, especially when you consider the myriad of pipes, fixtures, and fittings involved, not to mention the potential for a messy leak if something goes wrong. But fear not! With the right knowledge, tools, and a little patience, it’s a project that can be tackled with relative ease.
Here at Aqua Gleam Bathrooms, we truly understand the importance of a proper bath installation. It isn’t as simple as just choosing a beautiful bath and placing it in your bathroom. The process involves careful planning and precise execution, ensuring the bath fits well in the available space, is levelled perfectly, and is correctly connected to your home’s plumbing system.
Our comprehensive service doesn’t just stop at designing and planning. We guide you through every step – from preparing the bath area and installing the plumbing, to selecting, coordinating, and installing beautiful fixtures and fittings.
To give you a quick snapshot of the ‘how to plumb a bath in’ process, here’s a handy overview:
1. Mark your positions: Outline where your bath, waste pipe, and taps go.
2. Attach bath legs: Fix the bath’s legs to its base.
3. Drill tap holes: Carefully cut holes for your bath taps.
4. Isolate the water supply: Switch off the water supply to your bathroom.
5. Fix taps, overflow, and waste: Attach these essential components to your bath.
6. Even the load: Make sure your bath is level.
7. Fix the bath in place: Secure the bath to the wall.
8. Prepare to seal: Get ready to waterproof the joints.
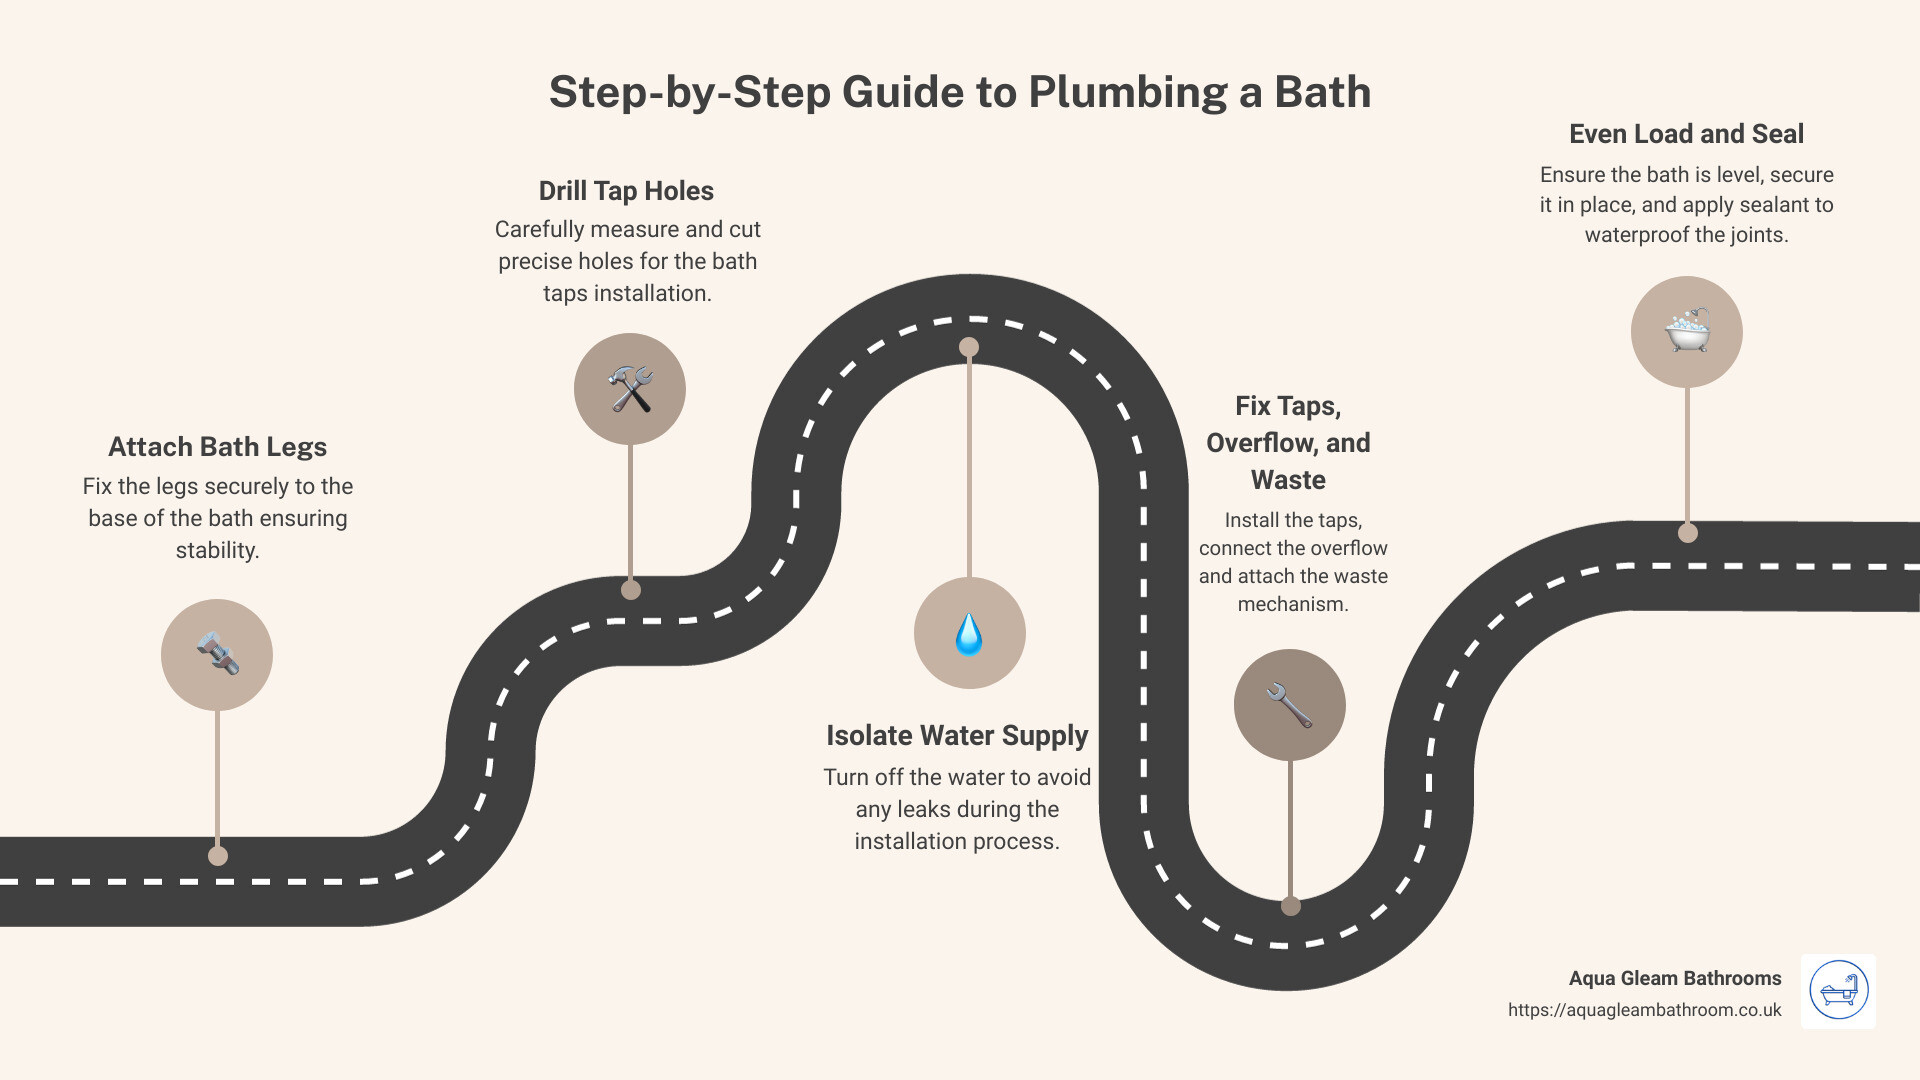
For a more comprehensive guide, check our infographic that delivers the details visually.
Understanding the Basics of Bath Plumbing
Just like any home improvement project, installing a bath requires careful planning and preparation. This process might seem daunting, but we at Aqua Gleam Bathrooms are here to guide you through it. It’s crucial to understand the basics of bath plumbing before you start, to ensure a smooth installation and avoid any potential issues down the line.
Different Types of Baths and Their Plumbing Requirements
Baths come in different types and sizes, each with its unique plumbing requirements. Whether it’s a freestanding tub, alcove bath, or a corner bath, each type requires a specific plumbing setup. It’s important to select the right bath for your bathroom, considering the style and material.
When choosing a bath, also consider its drain and faucet configuration. If you’re replacing an old tub, choose a new tub with a similar configuration to make installation easier. Make sure the drain and faucets are on the same side and in roughly the same location. Furthermore, always check if your chosen bath comes with all the faucets, drains, and accessories you will need .
Importance of Checking for Damage or Faults Before Installation
Before you start with the installation process, it’s critical to examine the bath for any damage or faults. This includes checking for any cracks or chips in the tub itself, as well as any issues with the fixtures. It’s also recommended to inspect the condition of your existing plumbing setup. Look for any signs of damage or wear that could potentially lead to leaks or other problems down the line.
Legal Requirements and Building Regulations for Bath Installation
In the UK, any new bathroom installation or significant alterations must comply with the local building codes. These regulations ensure that the installed bath is safe to use and meets the standards for water efficiency and waste disposal. Therefore, it’s crucial to check your local building codes before you start the project to ensure that you are in compliance with all requirements .
In conclusion, understanding the basics of bath plumbing is the first step towards a successful bath installation. It helps you make informed decisions about the type of bath to install, prepare adequately for the installation, and ensure that your new bath complies with the necessary legal requirements. In the next section, we will dive deeper into the tools and materials needed for bath plumbing.
Tools and Materials Needed for Bath Plumbing
It’s no secret that the successful installation of a bath involves a comprehensive set of tools and quality materials. Having the right supplies on hand not only streamlines the process but also ensures a long-lasting and high-quality finish. Let’s delve into what you’ll need.
List of Essential Tools for Bath Installation
Installing a bath isn’t a small task, but with the right set of tools at hand, it becomes more manageable. Here is a list of essential tools you’ll need to plumb a bath in:
- Tape Measure: For taking accurate measurements to ensure your bath fits perfectly in the available space.
- Level: To ensure your bath is perfectly flat and even.
- Pencil: To mark your bath, waste pipe, and tap positions on the wall.
- Drill: For drilling tap holes.
- Adjustable Wrench: To secure the drain using the locknut and gasket provided.
- Pliers: To tighten the strainer from inside the tub.
- Hacksaw: To cut the PVC pipe into the correct length.
- Utility Knife: To slice through the caulk that connects the tub and floor.
It’s crucial to ensure that all tools are in good condition and fit for use. Quality tools are not only safer but also more efficient and reliable.
Importance of High-Quality Materials for Longevity
At Aqua Gleam Bathrooms, we cannot overemphasize the importance of using high-quality materials for your bath plumbing. The materials you use directly impact the durability and longevity of your bath. Here are some materials you’ll need:
- PVC Pipe and Fittings: These are used to connect the drain of the bath with the waste pipe. PVC is a dependable and durable material ideal for this purpose.
- PVC Tubing: This is perfect for your bath’s water supply lines.
- PVC Drain Assembly Kit: This kit contains several parts that you’ll need for the drain, such as the drain chute, strainer, strainer cover, trip lever, stopper, linkage, and overflow drain cover.
- Silicone Caulk: This is used to seal off gaps around the bath, ensuring a watertight seal.
- Plumber’s Putty: This is used to create a watertight seal around the drain flange.
Investing in high-quality materials will pay dividends in the long run. It will reduce the risk of leaks, ensure the longevity of your bath, and give you peace of mind that your investment will stand the test of time.
In the next section, we will guide you through the step-by-step process of how to plumb a bath in. So, roll up your sleeves and let’s get started!
Step-by-Step Guide to Plumbing a Bath
Plumbing a bath involves several specific steps. Each one is crucial to ensure a successful installation and a functional, leak-free bathtub. Here’s a simple, step-by-step guide on how to plumb a bath in:
Marking Positions and Attaching Legs
Start by marking the position of your bath, waste pipe, and pipes on your wall using a pencil. It’s crucial that these marks are accurate because they will guide your installation process. Once you’ve marked the positions, attach the legs to your bathtub. These legs will provide the necessary support to your bath, making sure that it stays stable and level.
Drilling Tap Holes and Isolating the Water Supply
Before proceeding, make sure to isolate the main water supply to avoid any water-related accidents. Once the water supply is off, you can drill the tap holes as per your bath’s specifications. Always follow the manufacturer’s instructions when drilling tap holes to avoid damaging your new bath.
Fixing Taps, Overflow, and Waste
Next, fix the taps, overflow, and waste to your bath. The taps, as well as the overflow and waste, should be securely fixed and properly sealed to prevent any leaks.
Evenly Distributing the Load and Fixing the Bath into Place
After fixing the taps, overflow, and waste, it’s time to evenly distribute the load and fix the bath into place. This process involves filling the bath with water to allow the frame to settle quickly, preventing cracked walls and tiles the first time the bath is used.
Preparing to Seal, Applying Sealant, and Fitting Bath Panels
Finally, prepare to seal your bath. Apply a neat, straight line of sanitary sealant along the gap between your bath and your wall. Don’t forget to remove the masking tape before the sealant sets. To smoothen out the sealant and form a tight bond, wet your finger with a water and fairy liquid mix, then run it slowly along the sealant line. Lastly, fit your bath panels. These panels will provide a finished look to your bath and hide any visible plumbing.
At Aqua Gleam Bathrooms, we understand that installing a bath might be a daunting task for some homeowners. However, with careful planning, the right tools, and a little patience, you can successfully plumb a bath in your bathroom. Always remember to check your local building regulations to ensure your renovation stays in line with health and safety laws. And if you ever need professional help, we’re just a call away.
Expert Tips for Successful Bath Installation
Now that you understand the steps involved in plumbing a bath, let’s look at some expert tips. These insights will help ensure your bath installation is smooth and successful.
Importance of Level Surface and Proper Height Adjustment
One of the critical aspects of bath installation is ensuring a level surface. A bath that isn’t level can lead to water pooling or not draining correctly. Use a level to check the floor surface and add shims if necessary to balance the surface.
When installing the legs of the bath, make sure they are all at the same height before standing the bath upright. Once the bath is against the wall, you can adjust the leg heights as needed to ensure it’s level.
Tips for Fitting Bath Taps, Waste, and Overflow
Fitting the bath taps, waste, and overflow correctly is crucial to ensuring your bath functions properly. When installing the taps, follow the manufacturer’s instructions provided. If you’re unsure, check out our how to fit bath taps guide for step-by-step instructions.
To secure the bath waste, use the washers provided. A thin bead of silicone can help keep the seal watertight for longer. When fixing the overflow, ensure it’s positioned correctly to prevent water from spilling over the edges of the bath.
Importance of Hiring a Professional for Full Plumbing and Installation
While a DIY approach can save time and money, plumbing and installing a bath is a task that requires expertise. If not done correctly, it can lead to costly damages and potential safety hazards.
At Aqua Gleam Bathrooms, we understand the intricacies of bath installation. Our team of professional installers ensures that every aspect of your bath installation is executed to perfection. We adhere to industry standards, guaranteeing that your installation meets the highest quality and safety benchmarks.
By hiring a professional installer, you’re not just getting the job done; you’re investing in quality, peace of mind, and a service that stands the test of time.
It’s not just about how to plumb a bath in; it’s about ensuring that your bath is not just beautiful but also functional, durable, and perfectly suited to your lifestyle. For more advice on bathroom renovations or to discuss your project, contact us.
Addressing Common Questions about Bath Plumbing
After going through the step-by-step guide on how to plumb a bath in, you might still have a few questions in mind. We at Aqua Gleam Bathrooms believe in transparency and educating our clients, so let’s address some of the most commonly asked questions about bath plumbing.
Why Do Plumbers Fill the Bath?
You might have noticed that after installing a bath, plumbers often fill it up with water. This is not a random step; there’s a very practical reason behind it. A full bathtub is quite heavy, and this weight helps the frame of the bathtub settle quickly into place. This step is crucial in preventing potential issues down the line, such as cracked walls and tiles when the bathtub is used for the first time. This process ensures that your bathtub is ready for use and will provide you with a relaxing experience from day one.
How Hard is it to Fit a Bath?
The difficulty of fitting a bath depends on several factors, like the existing plumbing, the type of bath you’re installing, and your familiarity with DIY projects. If the water supply can be easily isolated and the waste and supply pipes don’t need major alterations, fitting a bath should be a straightforward process. However, keep in mind that the process involves precise measurements, careful handling of the bathtub, and accurate plumbing connections. If you’re unsure or uncomfortable with any of these steps, we recommend hiring a professional. At Aqua Gleam Bathrooms, we have a team of experienced professionals who can handle this task efficiently and to the highest standards.
What Do You Put Under a Bathtub for Support?
The support underneath a bathtub is important for its stability and longevity. Different types of bathtubs require different types of supports. For instance, many bathtubs are angled towards the drain, which could make it difficult to use a simple flat surface like plywood for support. Instead, a tailored support that matches the angle and shape of the bathtub is used to provide a secure and stable base. This support system ensures that the bathtub can handle the weight of the water and the person using it without any risk of damage or instability.
We hope this clears up any lingering questions you may have had about how to plumb a bath in. If you have any more queries or need professional assistance with your bathroom renovation, don’t hesitate to get in touch with us. We’re always here to help you create the bathroom of your dreams.
Conclusion
Recap of the Importance of Proper Bath Installation
After going through this comprehensive guide on how to plumb a bath in, it’s clear that installing a bath is no minor task. Ensuring the bath fits comfortably, preparing the floor and walls, attaching the bath fixtures, and making sure everything is properly sealed require careful planning and meticulous execution. Additionally, the way the bath is installed can have long-term effects on its functionality and durability.
Encouragement to Consult Professionals for Assistance
While it is feasible for enthusiastic DIYers to install a bath, it’s important to note that professional assistance can make a significant difference in the outcome. At Aqua Gleam Bathrooms, we’re committed to providing high-quality bathroom installation services, including bath plumbing. If you’re considering a bathroom renovation or simply need assistance in installing a bath, we encourage you to reach out to our team.
Final Thoughts on the Value of High-Quality Workmanship and Attention to Detail
Lastly, we can’t stress enough the value of high-quality workmanship and attention to detail in ensuring a successful bath installation. As revealed in our previous work, attention to detail, from the initial planning stages to the final sealing, is crucial in achieving not only an aesthetically pleasing outcome but also a functional and long-lasting bath. We believe in doing things right the first time, which ultimately saves you time, money, and potential stress down the line.
In conclusion, whether you decide to take on the task of installing a bath yourself or opt for professional assistance, the goal is to create a beautiful and functional space that will stand the test of time. At Aqua Gleam Bathrooms, we’re here to help you achieve that goal.