
Key Points for Bathroom Tile Installation:
– Durability: Choose ceramic or stone for long-lasting results.
– Appearance: Align your tile choice with your bathroom’s theme.
– DIY Potential: Doing it yourself can save money and offer personal satisfaction.
– Cost-Saving: DIY installation often costs less than professional services.
Are you tired of looking at your outdated bathroom tiles and dreaming of a refresh? Is the thought of hiring a professional making your wallet scream for mercy? You’re not alone. A beautiful, functional bathroom is a key part of any home, but the costs can add up quickly. What if we told you that with a bit of patience and the right preparation, you can DIY your bathroom tile installation, saving money without sacrificing quality?
This guide will walk you through everything you need to know to lay bathroom tiles like a pro – from gathering your tools and prepping your site to the actual installation process. We’ll also touch upon how to estimate the cost of your tile project to ensure it aligns with your budget. Whether you’re dealing with an old shabby bathroom floor or installing new tiles from scratch, we’ve got you covered.
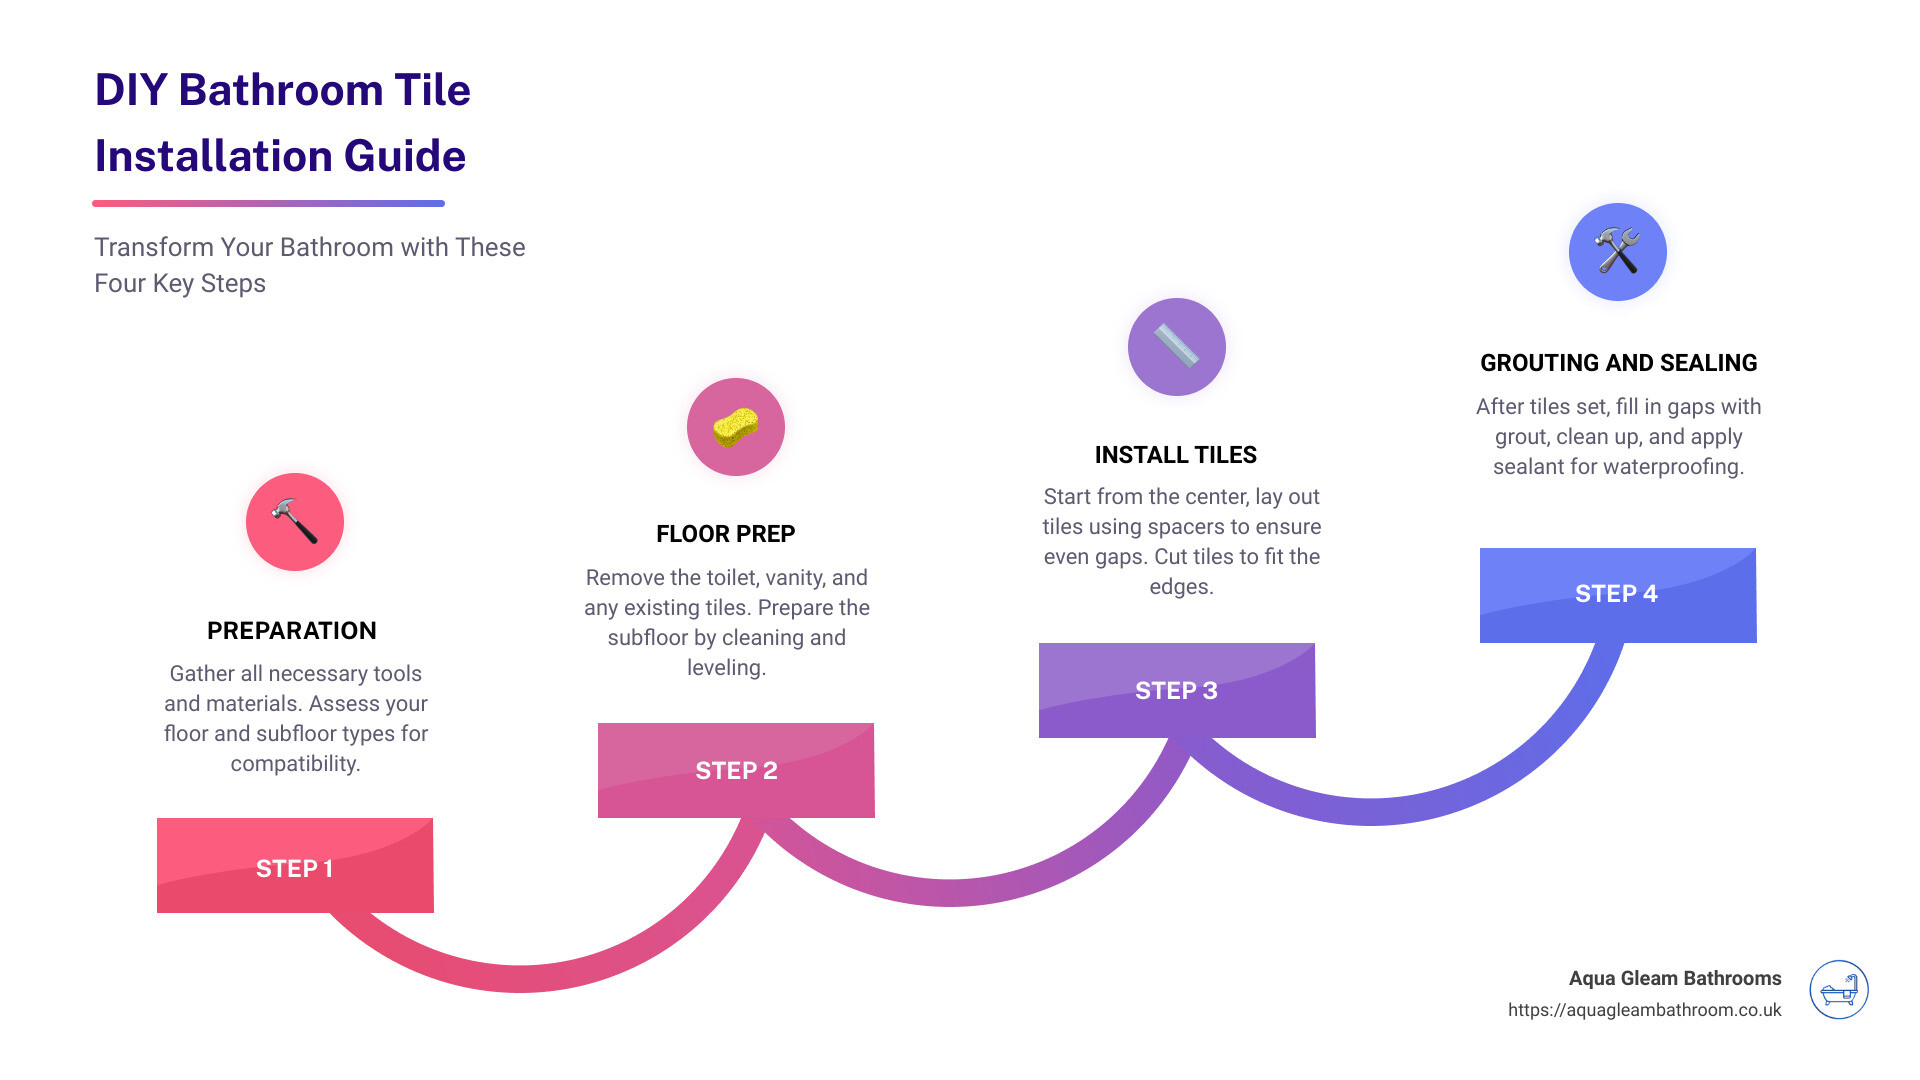
Let’s master the art of bathroom tile installation together, turning that daunting task into an exciting DIY project that not only enhances the durability and appearance of your bathroom but also saves your wallet from the weight of hiring a professional.
Preparing for Tile Installation
Tools Required
Before you start your bathroom tile installation journey, gather the essential tools to ensure a smooth process. Here’s a checklist:
– A quality saw: For cutting tiles to fit your space perfectly.
– Tile mortar and grout: To secure the tiles in place and fill the gaps between them.
– Trowels of various sizes: For spreading mortar and grout.
– Measuring tape: To ensure accurate placement.
– Tile spacers: To maintain even spacing between tiles.
– A framing square and long level: For precise alignment.
– Safety goggles and gloves: To protect yourself during the installation.
Materials Required
The materials you’ll need include:
– Tiles: Choose based on your desired look and functionality.
– Backer board: To provide a stable and water-resistant substrate for the tiles.
– Thin-set: To adhere tiles to the backer board.
– Primer (if necessary): For preparing existing tiles or surfaces for the new installation.
Assessing Your Floor
Before laying new tiles, assess your bathroom floor carefully:
– Check for levelness: Use a long level to identify any slopes or dips. These need to be addressed before installation to prevent cracking and ensure water drains correctly.
– Calculate square footage: Measure the length and width of your bathroom floor to determine how much tile and backer board you’ll need. Add an extra 15% for waste and mistakes.
Subfloor Types
The type of subfloor you have can impact the preparation needed:
– Concrete: Ensure it’s level and free of cracks. If it’s not, you may need to use a self-leveling compound.
– Wood: It’s crucial to lay a backer board over a wooden subfloor to prevent flexing, which can lead to tile cracking.
Joist Spacing
If you have a wooden subfloor, check the spacing between the joists:
– 16 inches or less: Generally suitable for tile installation with the addition of a backer board.
– Greater than 16 inches: May require additional support to prevent flexing. Consider consulting a professional to ensure your floor can support the weight of the tiles.
By carefully preparing for your bathroom tile installation, you can ensure a solid foundation that will last for years to come. Good preparation is the key to a successful DIY project. At Aqua Gleam Bathrooms, we’re here to support you every step of the way, ensuring you have all the information and materials you need to bring your dream bathroom to life.
Estimating the Cost of Your Tile Project
Embarking on a bathroom tile installation project can be exciting, but before diving in, it’s crucial to have a clear understanding of the potential costs involved. By accurately estimating these expenses, you can plan your budget more effectively and avoid any surprises along the way. Let’s break down the main cost components:
Square Footage Calculation
The first step is to measure the square footage of your bathroom floor. To do this, simply multiply the length by the width of the room. For instance, if your bathroom is 6 feet wide and 8 feet long, the total square footage would be 48 (6×8).
Waste Factor
It’s important to account for waste, especially when cutting tiles to fit around corners or fixtures. We recommend adding 10 percent to your total square footage to cover this. Using the example above, you would calculate an additional 4.8 square feet (10% of 48), bringing your total to 52.8 square feet of tile needed.
Tile Cost Range
Tile prices vary widely based on material, design, and quality. In general, you can find tiles priced between £3 and £50 per square foot. To give you an idea, for a mid-range tile costing £10 per square foot, the tile cost for a 52.8 square foot bathroom would be approximately £528.
Backer Board Installation
If you’re working with a wood subfloor, installing a backer board is essential to create a stable base for your tiles. The cost of backer board typically adds around £2 per square foot to your project. For our 52.8 square foot example, this would equate to an additional £105.6.
Tile Removal Tools
If you need to remove existing flooring or tiles, there are specific tools required for the job, which could cost between £60 to £80 in total. These tools are essential for preparing your floor for new tiles.
Putting It All Together
Let’s consider the example of a 52.8 square foot bathroom, with mid-range tiles and the need for a backer board. The estimated costs would be:
- Tiles: £528 (for mid-range £10/sq. ft. tiles)
- Backer Board: £105.6 (at £2/sq. ft.)
- Tile Removal Tools: £70 (average cost)
- Total Estimate: £703.6
This estimate does not include additional materials like grout and sealant, or special features such as underfloor heating. However, it provides a solid foundation for budgeting your project.
At Aqua Gleam Bathrooms, we understand the importance of planning and budgeting for your bathroom renovation. Our team is here to provide guidance and support, ensuring you have all the resources you need for a successful bathroom tile installation. Investing time in accurately estimating your project costs can save you money and stress in the long run.
The Tile Installation Process
Prep the Floor
Toilet removal: Begin by turning off the water supply to the toilet. Flush the toilet to drain the tank and sponge out any remaining water. Disconnect the water supply line, and then unscrew the toilet from the floor. Gently rock it back and forth to break the wax seal and lift it away.
Vanity considerations: If the vanity is sitting on the existing floor, consider removing it to ensure the tile goes under it for a cleaner look. If removal isn’t an option, tile up to the vanity’s base but be aware that this might affect how level the vanity sits.
Baseboard handling: Remove the baseboard to allow room for the tile to fit underneath. This ensures a neater appearance and hides any uneven cuts at the room’s edges.
Door trimming: The new tile will raise the floor height, possibly requiring the bottom of the door to be trimmed. Use a piece of tile and backer board as a guide to mark the new door height.
Scrub the Floor with Stripper
Using a solution of water and vinyl floor stripper, scrub the old floor vigorously. This removes any wax or adhesive residue, and the slight scratches left behind help the new adhesive bond better.
Drive Screws into the Floor Joists
Secure the subfloor to the joists by driving screws every eight inches. This prevents any movement that could crack the tile. Use chalk lines to mark the joist locations for accuracy.
Cut the Door Casing
Undercut the door trim to allow the tile to slide underneath. A piece of backer board and tile can be used as a height guide for the saw.
Fill Low Spots with Thin-Set
Inspect the floor for any low spots or areas where the vinyl has loosened. Cut out these sections and fill them with thin-set mortar, ensuring a level surface for the tile.
Install Backer Board
Lay out the backer board, cutting it as necessary to fit the space. Space the pieces 1/8-in. apart and secure them with screws. Use a scoring knife for straight cuts and a drywall saw for any irregular shapes.
Trowel on the Thin-Set
Apply thin-set mortar over the backer board using a notched trowel. Ensure the comb direction is consistent to aid in tile adhesion. “Back butter” larger tiles to ensure a good bond.
Cover the Joints
Apply mesh tape over the backer board joints and skim over it with thin-set. This reinforces the floor and prevents cracking.
By following these steps, we at Aqua Gleam Bathrooms ensure that the foundation for your bathroom tile installation is solid, level, and ready for the beautiful new tile that will transform your space. Our meticulous attention to detail during the preparation phase sets the stage for a flawless and durable tile installation.
Tile Layout and Installation
Laying out and installing bathroom tiles is an art that requires precision, patience, and a bit of creativity. Let’s dive into how to achieve a professional-looking finish with your bathroom tile installation.
Tile Layout
The first step in tile layout is to find the center of your room. This involves measuring the distance between the two most dominant walls and placing the center row of tiles parallel to them. The aim here is to:
- Position full tiles in visually prominent areas, such as against doorways and along the bathtub. This not only enhances the appearance but also minimizes the need for cutting tiles.
- Adjust the layout as necessary to ensure that the cut tiles are no smaller than half of their original size. This helps in maintaining the aesthetic appeal of the room.
- Minimize cutting by planning your layout carefully. Use tile spacers to maintain even gaps between tiles and to get an accurate idea of how the finished surface will look.

Attach Guide Boards
Once your layout is planned, it’s crucial to create a reference point for laying the tiles. This is where guide boards come into play.
- Place guide boards along your starting line to ensure your tiles are laid in a straight line. These boards act as a temporary guide that helps in maintaining the right angle and alignment as you lay the first row of tiles.
Set the Tile
Now, the exciting part – setting the tiles into place. Here’s how to do it right:
- Choose the right trowel. The size of the trowel depends on the size of the tile. A larger tile requires a larger trowel to ensure adequate adhesive coverage.
- Dampen the backer before applying the thin-set. This prevents it from absorbing moisture too quickly from the thin-set, ensuring a stronger bond.
- Mix the tile adhesive according to the manufacturer’s instructions. Aim for a consistency that will hold the tile firmly in place.
- Use the press and wiggle technique. Don’t just place the tile on the thin-set; press down and wiggle it slightly to ensure it’s firmly embedded in the adhesive.
- Employ spacers to maintain uniform gaps between the tiles. These gaps are crucial for a symmetrical finish and will be filled with grout later.
Set the Perimeter Tiles
The final step involves cutting and setting the perimeter tiles:
- Cutting techniques. Use a tile cutter or a wet saw for precise cuts. Measure twice and cut once to ensure the tile fits perfectly around the edges and against fixtures.
- Caulked joints. Where the tile meets fixtures like bathtubs, leave a space wide enough for caulking. This joint should be the same width as the spacing between tiles to maintain a uniform look.
By following these steps, we at Aqua Gleam Bathrooms help ensure your bathroom tile installation not only looks professional but also stands the test of time. Our expertise and attention to detail in every phase of the installation process, from layout to sealing the perimeter tiles, guarantee a stunning finish that you’ll enjoy for years to come.
Grouting and Finishing Touches
Before You Start to Grout
Before diving into the grouting process, there are a few preparatory steps to ensure a smooth application. First, ensure all tiles are securely in place and the thin-set has fully hardened. Second, remove all spacers. This creates the necessary space for grout. Next, tackle the toilet flange by installing an extension ring. This step is crucial for a level finish and to prevent future leaks. If the flange sits below the tile level, add an extension ring or two to bring it flush or above the tile surface. Secure it with a generous application of silicone caulk and stainless steel or brass screws.
For the transition strip, which bridges the gap between different flooring materials, remove any old metal strips, cut the new strip to fit, and secure it with construction adhesive. Lastly, press a backer rod into joints along the walls. This prevents grout from filling these expansion joints, which should be caulked later.
Grout the Joints
Mix your grout to a consistency akin to mashed potatoes; too much liquid can weaken the grout. Begin in a corner, spreading the grout across the floor with a rubber float held at a 45-degree angle. Work the grout into the joints by pressing firmly — this is crucial for full coverage and a professional finish. Always move the float diagonally across tiles to avoid pulling grout out of the joints. After filling the joints, remove excess grout by holding the float nearly upright and scraping it across the tiles.
Grout Cleanup
Once grouting is complete, focus shifts to cleanup. Start with a damp sponge to wipe away excess grout from the tile surface. Be gentle on your first pass to avoid disturbing the freshly packed joints. Rinse your sponge frequently to keep it clean. You may need a synthetic scouring pad for tougher spots. Be mindful of where you place your knees and feet during this process to avoid ruining your hard work.
Applying Sealant
Sealing your tiles is the final step, especially important for porous tiles that absorb water. To determine porosity, place a wet sponge on the tile. A dark spot indicates absorption. Choose a penetrating sealer for a natural finish or a topical sealer for a glossy look. Clean the tiles and grout lines thoroughly, then let them dry. Apply the sealer with a spray bottle, holding it about 15cm from the surface. After a brief wait, wipe off the excess with a damp sponge.
At Aqua Gleam Bathrooms, we believe that mastering these final touches in your bathroom tile installation not only preserves the beauty of your design but also enhances the durability and longevity of your flooring. With our expert guidance, achieving a professional and lasting finish is within reach for every homeowner.
Frequently Asked Questions about Bathroom Tile Installation
How do I choose the right tile for my bathroom?
Choosing the right tile for your bathroom involves several factors. First, consider the material. Ceramic and porcelain tiles are popular for their water resistance and durability, making them ideal for bathroom floors and walls. If you’re looking for a luxurious look, marble or travertine might be your choice, but remember they require more maintenance.
Next, think about slip resistance. Bathrooms are wet areas, so choosing tiles with a textured surface or those specifically labeled as slip-resistant can help prevent accidents.
Size and shape also play a crucial role. Larger tiles can make a small bathroom appear bigger, but they might require cutting to fit around fixtures. Smaller tiles offer more design flexibility and are often used for shower floors because of their better grip.
Finally, don’t forget about style and aesthetics. Your tiles should complement the overall design of your bathroom. Consider the color, pattern, and texture that will match your fixtures and decor.
Can I tile over existing bathroom floor tiles?
Yes, you can tile over existing bathroom floor tiles, but it requires proper preparation. Ensure the old tiles are firmly attached, clean, and free of wax or grease. Sand the surface to create a rough texture for better adhesion. Applying a primer can also help the new tiles adhere properly. However, be mindful that tiling over existing tiles will raise the floor level, which might require adjustments to doors and fixtures.
How do I ensure my tile is waterproof, especially in the shower area?
Ensuring your tile is waterproof, particularly in the shower area, involves more than just choosing the right tile. The key is in the underlayment and sealing.
For the shower area, use a waterproofing membrane beneath the tiles. This membrane protects the wall or floor beneath from water infiltration. Schluter®-KERDI is a popular option for a waterproofing membrane that can be applied directly to the area you plan to tile.
After installing the tiles, grout plays a significant role in waterproofing. Opt for a high-quality, waterproof grout, and consider adding a grout sealer for extra protection.
Lastly, caulk all corners and edges where the tile meets the shower base, fixtures, or any other area not grouted. Use a silicone-based caulk designed for bathrooms, as it will provide a waterproof seal that’s also flexible.
At Aqua Gleam Bathrooms, we’re committed to helping you achieve a beautiful, durable, and waterproof bathroom through professional tile installation. With careful selection and installation, your bathroom tiles will not only look stunning but also withstand the rigors of daily use.
Conclusion
High-quality workmanship, Attention to detail, Aqua Gleam Bathrooms

In wrapping up our guide to mastering the art of bathroom tile installation, we circle back to the core principles that drive every successful project: high-quality workmanship and meticulous attention to detail. At Aqua Gleam Bathrooms, these aren’t just buzzwords; they’re the essence of how we approach every single bathroom renovation, big or small.
Our team of professionals is dedicated to ensuring that every aspect of your bathroom tile installation is handled with precision, from the initial planning stages to the final touches that make your space uniquely yours. We understand that your home is your sanctuary, and we’re honored to help enhance it with our expertise in bathroom renovations.
Whether you’re updating an outdated bathroom, fixing a dysfunctional space, or simply wanting to add value and beauty to your home, we’re here to guide you through the process. Our commitment to high-quality workmanship ensures that your new bathroom will not only look stunning but will also stand the test of time.
Attention to detail is what sets us apart. We pride ourselves on our ability to capture your vision and bring it to life with impeccable precision. From selecting the perfect tiles that complement your style to ensuring every tile is laid with care, our team goes above and beyond to deliver a flawless finish.
Choosing Aqua Gleam Bathrooms means entrusting your home to professionals who truly care about your satisfaction. Our comprehensive approach to bathroom tile installation guarantees a smooth and efficient process, minimizing disruption to your daily routine and leaving you with a space that’s not just renovated, but transformed.
To learn more about how we can help elevate your bathroom with our professional tiling services, visit our Tilers Cardiff service page. Let us help you make your dream bathroom a reality.
Thank you for considering Aqua Gleam Bathrooms for your renovation needs. We look forward to the opportunity to bring our high-quality workmanship and attention to detail to your home.