

Why Fixing a Leaky Kitchen Faucet is Crucial
How to fix a leaky kitchen faucet:
1. Turn off the water supply: Find and turn off the shut-off valve below the sink.
2. Remove the faucet handle: Pry off the cap and unscrew the handle.
3. Inspect and replace parts: Look for damaged O-rings, washers, or seals and replace them.
4. Reassemble and test: Put the faucet back together and check for leaks.
A leaky kitchen faucet isn’t just a minor annoyance; it can also lead to higher water bills and potential water damage. This guide will walk you through how to fix a leaky kitchen faucet easily and effectively.
Overview
Leaky faucets can waste gallons of water daily, impacting both your wallet and the environment. The American Water Works Association estimates that leaks can waste up to 10,000 gallons per year in an average household. Fixing leaks promptly can save water and reduce your utility costs.
Importance of Fixing Leaks
Ignoring a dripping faucet can lead to more significant problems over time. Continuous leaks can cause wear on other faucet components, leading to more complex and costly repairs. Furthermore, the water damage can extend beyond the sink, potentially affecting your cabinets and flooring.
Water Conservation
Fixing leaky faucets is an easy way to contribute to water conservation efforts. By tackling small issues before they become big problems, you can help save one of our planet’s most precious resources.
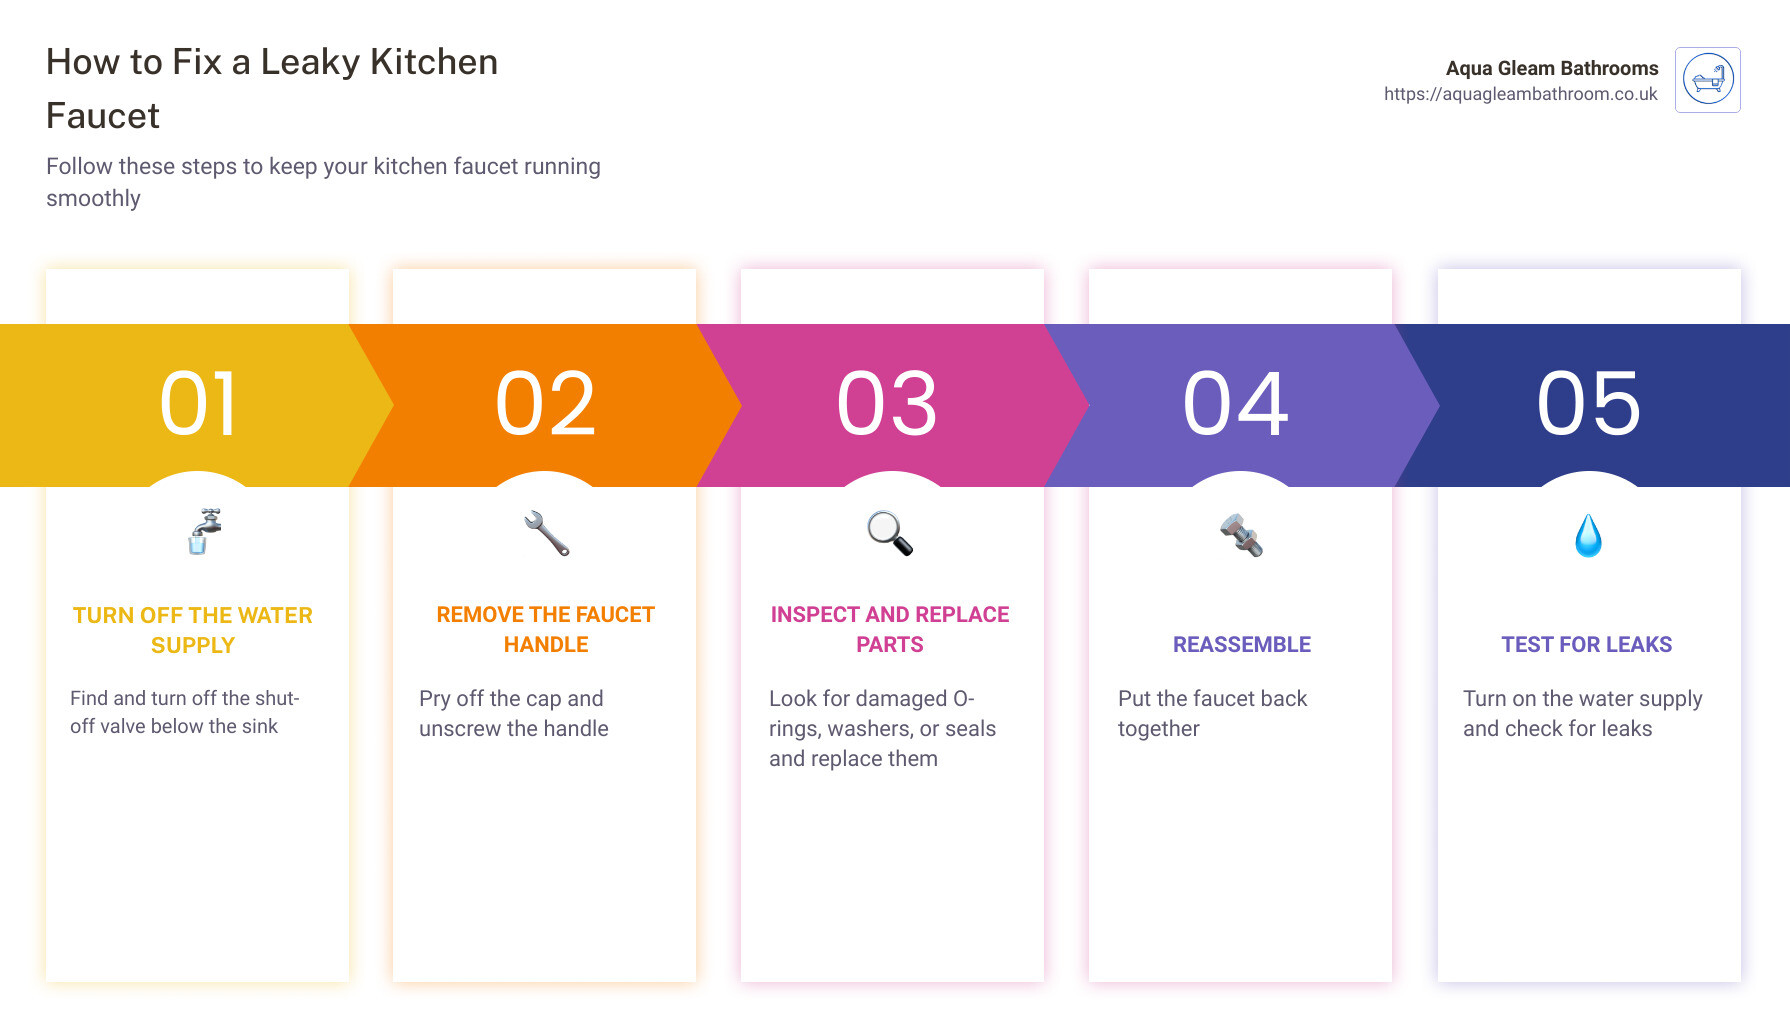
Follow these steps to keep your kitchen faucet running smoothly and efficiently. Dive in to learn how to tackle different types of faucets and what causes these annoying leaks.
Tools and Materials Needed
Before diving into how to fix a leaky kitchen faucet, gather the necessary tools and materials. Having everything on hand will make the process smoother and more efficient.
Essential Tools
-
Adjustable Wrench
– An adjustable wrench is crucial for loosening and tightening nuts and bolts. It’s versatile and can fit various sizes, making it ideal for plumbing tasks.

-
Screwdriver
– A 4-in-1 screwdriver is handy because it includes different types of heads (flathead and Phillips). You’ll need this to remove screws from the faucet handle and other components.
-
Pliers
– Slip-joint pliers or needle-nose pliers help in gripping and turning small parts. They are especially useful for removing retaining clips and O-rings.

Replacement Parts
-
O-ring Seals
– O-rings are rubber seals that prevent water from leaking out of the faucet. Over time, they can wear out and need replacing.
-
Washers
– Washers are small, flat rings that help create a watertight seal. They are often the culprit behind leaky faucets and are easy to replace.
-
Cartridges
– For cartridge faucets, you may need to replace the entire cartridge if it’s damaged. Make sure to get a compatible one for your faucet model.



Additional Materials
-
Plumber’s Grease
– Plumber’s grease helps lubricate O-rings and washers, ensuring they fit snugly and last longer. It also makes reassembly easier.

-
Towel
– A towel is useful for wiping up any water spills and keeping your workspace dry. It also helps to lay it out under the sink to catch any small parts that may fall.

-
Protective Gloves
– Wearing gloves will protect your hands from sharp edges and give you a better grip on slippery parts. Choose a pair that fits well and is comfortable.

Pro Tip: Faucet Repair Kit
For ease, consider buying a faucet repair kit. These kits include all the necessary parts and can save you multiple trips to the hardware store. Kits are available for different faucet types, so make sure to get the one that matches your faucet model.
With these tools and materials, you’re well-prepared to tackle the task of fixing a leaky kitchen faucet. Next, let’s go through the detailed steps to shut off the water supply and start the repair process.
How to Fix a Leaky Kitchen Faucet
Shut Off the Water Supply
Before you start any repair, turn off the water supply. This prevents any accidental spills and ensures a dry work area.
- Locate the shut-off valve under the sink.
- Turn off the valve by twisting it clockwise.
- Confirm the water is off by turning on the faucet and checking that no water flows.
Pro tip: Always have a towel handy to catch any residual water in the pipes.
Remove the Faucet Handle
Next, remove the faucet handle to access the internal components.
- Pry off the handle cap using a flathead screwdriver. This exposes the screw.
- Unscrew the handle screw with a screwdriver.
- Remove the handle by gently lifting it off. If it’s stuck, use a handle puller or tap it gently.
Important: Keep all parts in order to make reassembly easier. Take photos if needed.
Inspect Internal Components
With the handle removed, inspect the internal components for wear and tear.
- Check O-rings for any cracks or misshaping.
- Inspect washers for signs of wear.
- Look for corrosion or any other damage on the internal parts.
Common culprits include worn-out washers and O-rings, which can cause leaks.
Replace Worn Parts
If you find any worn or damaged parts, replace them.
- Obtain replacement parts from a hardware store. Make sure they match the original parts.
- Install the new parts, ensuring correct alignment and seating.
- Use plumber’s grease to lubricate O-rings and washers for a better seal.
Note: A faucet repair kit can be very handy as it includes all necessary parts.
Reassemble the Faucet
Finally, reassemble the faucet to complete the repair.
- Reattach the handle by placing it back on the stem and securing it with the screw.
- Replace the handle cap if applicable.
- Turn on the water supply by twisting the shut-off valve counterclockwise.
- Check for leaks by turning on the faucet and inspecting for any drips.
If leaks persist, you may need to repeat the process or consult a professional.
With these steps, you should be able to fix most leaky kitchen faucets and save yourself from wasting water and money. Next, let’s explore the different types of faucets and their specific fixes.
Types of Faucets and Specific Fixes
Compression Faucets
Compression faucets are common in older homes and have separate hot and cold handles. They often leak due to worn-out washers.
- Remove decorative caps from the handles.
- Unscrew the handles using a screwdriver.
- Use a wrench to remove the valve stem.
- Replace the seat washer with a new one coated in plumber’s grease.
- Replace the O-ring on the valve stem.
- Reassemble the handles and check for leaks.
Ball Faucets
Ball faucets are usually found in kitchen sinks and have a single handle that rotates over a ball mechanism.
- Remove the decorative cover from the handle.
- Unscrew the handle with a screwdriver.
- Use pliers to remove the cap, cam, and seal.
- Remove the inlet seals and springs with needle-nose pliers.
- Install new O-rings, springs, valve seats, and cam washers from a repair kit.
- Reassemble the handle and test for leaks.
Cartridge Faucets
Cartridge faucets can have either one handle or two. They control the water flow with a cartridge that moves up and down.
- Unscrew the handle with a screwdriver.
- Remove the retaining clip holding the cartridge in place with pliers.
- Pull out the cartridge and replace the O-rings.
- Install a new cartridge if necessary.
- Reassemble the handle and check for leaks.
Ceramic Disk Faucets
Ceramic disk faucets are durable and have a single lever. Inside, they use ceramic disks to control water flow.
- Remove the escutcheon cap to access the handle.
- Unscrew the handle and remove the disk cylinder.
- Pry out the neoprene seals and soak them in white vinegar if they are reusable.
- Replace worn seals with new ones.
- Reassemble the handle and turn on the water slowly to avoid cracking the ceramic disk.
Single-Handle Faucets
Single-handle faucets can use various mechanisms like balls, cartridges, or disks to control water flow.
- Remove the handle by unscrewing the set screw.
- Access the internal mechanism:
- For ball types, remove the cap and collar.
- For cartridge types, pull out the retaining clip and remove the cartridge.
- For disk types, unscrew and remove the disk cylinder.
- Check and replace faulty parts such as O-rings, seals, or the entire mechanism.
- Reassemble the faucet and test for leaks.
Double-Handle Faucets
Double-handle faucets come in compression, cartridge, or disk types. They have separate handles for hot and cold water.
- Remove the handles by unscrewing the set screws or removing decorative caps.
- Access the internal mechanism:
- For compression faucets, remove the valve stem to access the washer.
- For cartridge or disk types, remove the retaining nut or clip.
- Replace the cartridge or clean and inspect the ceramic disks.
- Reassemble the handles and check for leaks.
By following these steps, you can address leaks for each type of faucet. Next, let’s look at some common causes of leaky faucets and how to prevent them.
Common Causes of Leaky Faucets
Understanding the common causes of leaky faucets can help you fix the issue quickly and prevent future problems. Here are the main culprits:
Worn-Out Washers
Washers press against the valve seat to create a watertight seal. Over time, the friction can wear them out, causing leaks. This is especially common in compression faucets.
Tip: Replace washers regularly to avoid leaks.
Damaged O-Rings
O-rings are small rubber rings that create a seal between the faucet’s moving parts. They can crack or become brittle over time, leading to leaks around the handle area.
Tip: Check O-rings during regular inspections and replace them if they show signs of wear.
Faulty Seals
Faucets have inlet and outlet seals that can wear out or become clogged with sediment. This is particularly an issue with cartridge faucets.
Tip: Clean or replace seals to maintain a watertight system.
Loose Parts
Sometimes, a leak is simply due to loose components. This can include nuts, screws, or the handle itself.
Tip: Tighten all loose parts during regular maintenance checks.
Water Pressure Variations
High water pressure can stress your faucet’s components, causing leaks. Water pressure should ideally be between 40 and 60 psi.
Tip: Install a pressure regulator to maintain optimal water pressure.
Age of Faucets
Faucets generally have a lifespan of 10 years. Older faucets are more prone to leaks due to worn-out parts and corrosion.
Tip: Consider replacing faucets that are over a decade old to avoid frequent leaks.
By understanding these common causes, you can take proactive steps to maintain your faucets and prevent leaks. Next, we’ll discuss tips to prevent faucet leaks and extend the life of your plumbing fixtures.
Tips to Prevent Faucet Leaks
Maintaining a leak-free faucet is crucial for conserving water and extending the life of your plumbing fixtures. Here are some practical tips to help you keep your faucet in top condition.
Regular Inspections
Inspect your faucets every three to six months. Look for early signs of wear and tear or corrosion. Pay attention to:
- Drips: Even small drips can indicate a bigger issue.
- Unusual noises: Sounds like squeaking or grinding.
- Corrosion: Check both the faucet and under the sink.
Tip: Use a flashlight to thoroughly inspect hard-to-see areas.
Regular Cleaning
Clean your faucets regularly with a gentle cleaner and soft cloth. Avoid harsh chemicals that can damage the finish and components.
- Mild soap and water work well for everyday cleaning.
- Vinegar is great for tougher deposits.
Tip: Periodically remove and clean the aerator to prevent clogging and ensure steady water flow.
Address Minor Issues
Don’t ignore minor issues. Small problems can quickly turn into big leaks.
- Tighten loose nuts or screws to fix minor leaks.
- Replace worn washers and O-rings as soon as you notice wear.
Tip: Keep a faucet repair kit handy for quick fixes.
Manage Water Pressure
High water pressure can strain your plumbing. Aim for water pressure between 40 and 60 psi.
- Install a pressure regulator if your water pressure is consistently high.
- Moderate and steady temperature settings can also help.
Tip: Use a pressure gauge to check your water pressure periodically.
By following these tips, you can prevent most common causes of faucet leaks and ensure your plumbing fixtures last longer. Regular maintenance is key to avoiding costly repairs and water damage.
Frequently Asked Questions about Fixing a Leaky Kitchen Faucet
How do I stop my kitchen faucet from dripping?
Stopping a dripping kitchen faucet is simpler than you might think. Start by removing the cam, washer, and ball from the faucet. These parts are often the culprits behind a steady drip.
- Replace the O-rings: Worn-out O-rings are a common cause of leaks. Swap them out with new ones.
- Add plumber’s grease: Apply a bit of plumber’s grease to the new O-rings to ensure a snug fit and smooth operation.
Even small drips can lead to significant water waste over time, so addressing this issue promptly is important.
Why does my faucet drip after I turn it off?
A faucet that drips after being turned off usually points to a loose or damaged seat washer. This is a common issue, especially with older sink faucets.
- Loose or damaged seat washer: The seat washer presses against the valve seat to stop the water flow. If it’s loose or worn out, water can seep through.
- Common issue with sink faucets: This is particularly prevalent in compression faucets, where the washer can degrade over time.
To fix this, you’ll need to replace the seat washer. This involves disassembling the faucet handle, removing the old washer, and installing a new one.
Why is the bottom of my kitchen faucet leaking water?
Leaks at the base of the faucet are often due to a clogged aerator or a faulty cartridge.
- Clogged aerator: Mineral buildup can clog the aerator, causing water to back up and leak out at the base. Remove the aerator, clean it with vinegar, and reattach it.
- Faulty cartridge: If cleaning the aerator doesn’t solve the problem, the issue might be a faulty cartridge. Cartridges control the flow and mix of water. Over time, they can wear out and cause leaks.
Replacing the cartridge typically involves removing the handle, taking out the old cartridge, and inserting a new one. Make sure to align the new cartridge correctly to avoid further leaks.
By addressing these common issues, you can keep your kitchen faucet in good working order and avoid the headache of persistent leaks.
Conclusion
Fixing a leaky kitchen faucet is not just about solving a minor annoyance. It’s about conserving water, saving money, and preventing potential damage to your home. By following the steps outlined above, you can tackle most common faucet leaks with confidence.
Regular maintenance is key to preventing leaks in the first place. Regularly inspecting and cleaning your faucet, managing water pressure, and addressing minor issues promptly can significantly extend the life of your kitchen faucet.
If a small leak becomes overwhelming or if you’re unsure about any step, it’s always best to call a professional. Aqua Gleam Bathrooms is here to help with all your kitchen and bathroom needs. Our team of experts can handle everything from minor repairs to complete renovations.
For more information or to schedule a consultation, design your custom kitchen with Aqua Gleam Bathrooms.
By taking these steps, you’ll not only maintain a functional and efficient kitchen faucet but also contribute to a more sustainable environment. Regular maintenance and timely repairs will ensure your kitchen remains a comfortable and enjoyable space for years to come.