
Transform Your Kitchen: A Step-by-Step Guide to Tiling Your Kitchen Floor

Tiling kitchen floors can be a great way to update the look and functionality of your kitchen. Whether you’re looking to add a touch of elegance or need a durable flooring option, this guide will walk you through each step of the process.
Here’s a quick answer to get you started:
– Benefits: Easy to clean, highly durable, and available in a wide variety of styles.
– Materials: Ceramic and porcelain tiles are top choices.
– Steps: Prepare the floor, dry layout, mix and apply thin-set, lay tiles, cut edges, grout, and seal.
The kitchen is often the heart of the home, and having a floor that’s both beautiful and resilient can make all the difference. Tiling offers numerous benefits, such as durability, ease of maintenance, and the ability to complement any interior design.
At Aqua Gleam Bathrooms, we understand how daunting a kitchen renovation can be. That’s why we’re committed to providing expert guidance and top-quality installation services to make your project as smooth as possible. With years of experience under our belt, we ensure that every tile is laid with precision and care.
Read on to learn the step-by-step process of tiling your kitchen floor, from choosing the right materials to sealing the final grout.
Tiling kitchen floors word guide:
– Kitchen backsplash tiling
– Custom tiling services
– High-quality bathroom tiles
Choosing the Right Tile
Selecting the perfect tile for your kitchen floor is crucial. It impacts not only the look but also the durability and maintenance of your space. Here, we’ll break down the types of tiles available, focusing on ceramic, porcelain, and marble options.
Types of Tiles
Ceramic Tiles
Ceramic tiles are a popular choice for kitchen floors. They are made from clay and fired at high temperatures, making them water-resistant and durable.
Pros:
– Cost-effective: Generally cheaper than porcelain and marble.
– Variety: Available in numerous colors, sizes, and patterns.
– Easy to cut: Easier to cut and install compared to porcelain.
Cons:
– Durability: Less durable than porcelain.
– Porosity: Can be more porous, requiring sealing in wet areas.
Porcelain Tiles
Porcelain tiles are a type of ceramic tile but are made from finer, denser clay and fired at higher temperatures.
Pros:
– Durability: More durable and less porous than ceramic tiles.
– Water-Resistant: Excellent for high-traffic and wet areas like kitchens.
– Variety: Comes in various styles, including wood-look options.
Cons:
– Cost: More expensive than ceramic tiles.
– Installation: Harder to cut and install, often requiring a wet saw.
Marble Tiles
Marble tiles bring a luxurious and neat look to any kitchen. They are natural stone tiles that offer a unique, upscale appearance.
Pros:
– Aesthetics: High-end, luxurious look.
– Unique Patterns: Each tile is unique, adding a bespoke element to your kitchen.
Cons:
– Maintenance: Requires more upkeep, including regular sealing.
– Durability: Softer and more prone to scratches and stains than ceramic or porcelain.
– Cost: Higher price point.
Durability and Aesthetics
When choosing the right tile, consider both durability and aesthetics.
- Durability: For high-traffic areas like kitchens, porcelain tiles are often the best choice due to their strength and water resistance. Ceramic tiles also offer good durability but may not last as long as porcelain.
- Aesthetics: The look of your kitchen can be transformed by the tile you choose. Marble tiles offer a timeless, neat look but require more maintenance. Ceramic and porcelain tiles come in a wide range of styles, including wood-look options, which combine the beauty of wood with the durability of tile.
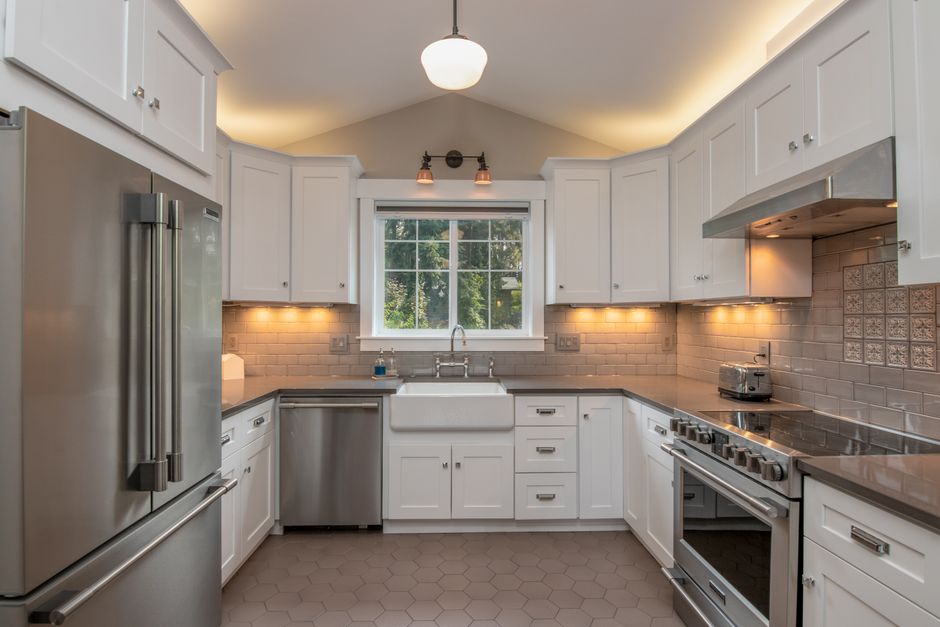
Expert Tip
Joe Ferrante, a tile expert with 30 years of experience, emphasizes the importance of choosing a tile that suits both your style and practical needs. He notes, “I love tile. It’s beautiful, and it doesn’t require much maintenance.”
Conclusion
Choosing the right tile for your kitchen floor is a balance between aesthetics and functionality. Whether you opt for the cost-effective ceramic, the durable porcelain, or the luxurious marble, each type of tile has its own set of benefits and drawbacks. Consider your lifestyle, budget, and design preferences when making your choice.
Up next, we’ll guide you through Preparing Your Kitchen Floor, ensuring a smooth and long-lasting tile installation.
Preparing Your Kitchen Floor
Before you start tiling your kitchen floor, proper preparation is crucial. This ensures a smooth installation and long-lasting results. Here are the key steps for preparing your kitchen floor.
Subfloor Inspection
First, inspect your subfloor. It must be clean, dry, and level. Look for any dips, cracks, or uneven spots.
Pro Tip: Use a straight board to identify uneven areas. If the subfloor has small dips, pour a self-leveling compound to fix them.
Cleaning
A clean subfloor is essential. Sweep or vacuum any dust and debris. If there’s any residue from previous flooring, remove it thoroughly.
Joe Ferrante, a tile expert, advises, “A clean subfloor ensures better adhesion and prevents future issues.”
Leveling
Leveling the floor is critical. An uneven subfloor can cause tiles to crack or pop up over time. Use a level to check the surface.
Steps:
1. Identify low spots and fill them with a self-leveling compound.
2. Sand down any high spots with 60 grit sandpaper.
Underlayment
Underlayment provides a stable surface for tile installation. It also helps with moisture resistance.
Types of Underlayment:
– Cement Board: Ideal for areas exposed to moisture. Attach it to the subfloor using screws and thin-set mortar.
– Plywood: Suitable for dry areas. Ensure it’s at least 1/2 inch thick for stability.
Tip: If you have a concrete subfloor, you may not need additional underlayment. Instead, use a crack isolation membrane to prevent cracks from transferring to the tile.
Cement Board Installation
For cement board installation, follow these steps:
- Cut the Boards: Measure and cut the boards to fit the space.
- Apply Thin-Set: Spread a layer of thin-set mortar on the subfloor.
- Lay the Boards: Place the boards onto the thin-set and screw them down.
- Tape the Seams: Use fiberglass mesh tape and thin-set to cover the seams.
Plywood Installation
For plywood underlayment, ensure it’s water-resistant. Here’s how to install it:
- Cut the Plywood: Measure and cut to fit the space.
- Attach to Subfloor: Use screws to secure the plywood to the subfloor.
- Seal the Edges: Apply a waterproof sealant to the edges to prevent moisture damage.

Final Check
Before moving on to laying the tiles, double-check the entire floor:
- Flatness: Ensure the floor is perfectly flat.
- Cleanliness: Remove any remaining dust or debris.
- Dryness: Make sure the subfloor is completely dry.
A well-prepared subfloor is the foundation of a successful tile installation. Up next, we’ll cover the Dry Layout and Planning, ensuring your tiles are perfectly aligned and ready to install.
Dry Layout and Planning
A well-executed dry layout and planning phase is crucial for a successful tile installation. It helps ensure your tiles are perfectly aligned and the final result looks professional. Here’s how to get started with tiling kitchen floors.
Chalk Lines and Center Point
Start by finding the center point of the room. This will be your reference for laying out the tiles.
- Measure the Midpoints: Measure the midpoints of all four walls.
- Snap Chalk Lines: Snap two chalk lines across the room, intersecting at the center. These lines should run from the midpoints of opposite walls.
The point where the lines intersect is your room’s center point. This is where you will start laying your tiles.
Checking for Square Lines
To ensure your chalk lines are square, use the 3/4/5 rule:
- Mark Points: On one chalk line, mark a point 3 feet from the center. On the perpendicular chalk line, mark a point 4 feet from the center.
- Measure Diagonal: Measure the diagonal distance between these two points. It should be exactly 5 feet.
If the distance isn’t 5 feet, adjust your lines until they are square. This step is crucial because if the lines are not square, your tiles will be off-center, making the room look unbalanced.
Layout Test
Before you start with the thin-set mortar, perform a dry layout test:
- Lay Half Rows: Lay a single half row of tiles in both directions from the center point, without any mortar. Use tile spacers to maintain consistent spacing.
- Check for Fit: Continue laying tiles until you reach the walls. If the space at the end is smaller than a third of a tile, adjust the chalk lines to ensure at least a half tile fits at both ends.
This test helps you visualize the final layout and make necessary adjustments before permanently setting the tiles.
Tile Spacers
Using tile spacers is essential for maintaining uniform gaps between tiles. This ensures a consistent grout line and a professional finish.
- Place Spacers: Insert spacers between each tile during your dry layout. This will help you see how the final spacing will look and make any necessary adjustments.
- Adjust as Needed: If the spacers reveal any alignment issues, adjust the tiles accordingly.
Joe Ferrante, who has been laying tile for 30 years, emphasizes, “Taking the time to plan and dry-fit your tiles can save you a lot of headaches down the road.”
Final Adjustments
After your dry layout, make any final adjustments:
- Recheck Square Lines: Ensure your chalk lines are still square.
- Verify Layout: Double-check that the tiles fit well and look balanced.
- Adjust Spacers: Make sure all spacers are correctly placed and gaps are even.
By carefully planning and performing a dry layout, you set a strong foundation for your tile installation. This attention to detail will pay off in the final results, making your kitchen floor look stunning and professionally done.
Next, we’ll dive into Mixing and Applying Thin-Set Mortar, ensuring your tiles adhere properly to the subfloor.
Mixing and Applying Thin-Set Mortar
Once your dry layout is perfect, it’s time to mix and apply the thin-set mortar. This step is crucial because it ensures your tiles adhere properly to the subfloor, providing a durable and long-lasting finish.
Thin-Set Mortar
Thin-set mortar is a type of adhesive used to secure tiles to the subfloor. It’s available in powder form and needs to be mixed with water to achieve the right consistency.
- Choosing the Right Mortar: For kitchen floors, it’s best to use a modified thin-set mortar, which offers better adhesion and flexibility.
Mixing the Thin-Set Mortar
Mixing the mortar correctly is essential for a strong bond.
- Read the Instructions: Always start by reading the manufacturer’s instructions on the mortar bag.
- Mixing Tools: Use a bucket and a mixing paddle attached to a drill.
- Add Water First: Pour the recommended amount of water into the bucket first.
- Add Mortar Powder: Slowly add the mortar powder to the water while mixing.
- Mix Until Smooth: Mix until you achieve a smooth, peanut butter-like consistency. Avoid lumps.
Tip: Let the mixed mortar sit for about 5-10 minutes, then remix. This process, known as slaking, helps improve the mortar’s performance.
Applying the Thin-Set Mortar
Proper application is key to ensuring your tiles stay in place.
- Work in Sections: Begin by applying mortar to a small section of the floor, about 2 feet by 2 feet.
- Use the Right Trowel: Use a notched trowel to spread the mortar. The size of the notches depends on the tile size; for most kitchen floor tiles, a 1/4-inch or 1/2-inch notched trowel is ideal.
- Apply Evenly: Hold the trowel at a 45-degree angle and spread the mortar evenly across the section.
- Comb the Mortar: Use the notched side of the trowel to comb the mortar in straight lines. This creates ridges that help the tile adhere better.
Checking Consistency
Before laying tiles, check the mortar’s consistency.
- Test Coverage: Place a test tile onto the mortar and press it down firmly. Then, lift it up to check the back. It should be fully covered with mortar.
- Adjust If Needed: If there are gaps or the coverage is uneven, remix the mortar or adjust your application technique.
Joe Ferrante, a tile expert with 30 years of experience, advises, “Always ensure your mortar is mixed to the right consistency and applied evenly. This will prevent issues like tile lippage or weak adhesion.”
Avoiding Common Mistakes
To avoid common pitfalls:
- Don’t Overmix: Overmixing can introduce air bubbles, weakening the mortar.
- Work Quickly: Thin-set mortar can dry quickly, so only apply as much as you can tile within 15-20 minutes.
- Keep It Clean: Wipe off any excess mortar from the tiles immediately to avoid hard-to-remove stains later.
By following these steps, you ensure a solid foundation for your tiles, setting the stage for a beautiful and durable kitchen floor.
Next, we’ll cover Setting the Tiles, ensuring they are perfectly aligned and securely placed.
Setting the Tiles
Now that the thin-set mortar is applied, it’s time to start setting the tiles. This is where your kitchen floor starts to take shape. Follow these steps to ensure your tiles are placed perfectly.
Placing Tiles
- Start at the Center: Begin placing tiles at the center of your layout, where the chalk lines intersect. This ensures that your tiles are aligned and symmetrical.
- Use Spacers: Place tile spacers between each tile to maintain consistent gaps. This is crucial for even grout lines later.
- Align Carefully: Align each tile with the chalk lines and adjacent tiles. This helps maintain a straight and even layout.
Tile Spacers
Tile spacers are small, plastic pieces that help ensure equal spacing between tiles.
- Position Correctly: Place two spacers along each side of the tile, one at each end. This prevents them from getting embedded in the mortar.
- Remove Before Mortar Sets: Always remove spacers before the mortar dries. This makes it easier to clean and grout later.
Alignment
Proper alignment is key to a professional-looking tile floor.
- Check As You Go: After placing a few tiles, step back and look down the edges to ensure they are straight.
- Adjust Quickly: If you notice any misalignment, adjust the tiles while the mortar is still wet. This is much easier than trying to fix it later.
Applying Finger Pressure
- Press Firmly: Press each tile down firmly into the mortar. This helps create a strong bond.
- Slide Slightly: After pressing, slide the tile slightly back and forth to ensure full contact with the mortar.
- Check Coverage: Occasionally lift a tile to check the back. It should be fully covered with mortar.
Avoiding Lippage
Lippage occurs when tiles are not level, creating uneven edges.
- Use a Level: Place a 2×4 on top of the tiles and tap lightly with a rubber mallet. This helps level the tiles and embed them firmly in the mortar.
- Check Frequently: After setting three or four tiles, check their level. Adjust as necessary before the mortar sets.
Pro Tip: “Always use a level and a rubber mallet to avoid lippage. This ensures a smooth, professional finish,” advises Joe Ferrante, a tile expert with 30 years of experience.
By following these steps, you can ensure that your tiles are perfectly aligned and securely placed. Next, we’ll discuss Cutting Tiles for Edges and Corners, ensuring a seamless fit for your entire kitchen floor.
Cutting Tiles for Edges and Corners
Once your tiles are set and aligned, it’s time to tackle the edges and corners. Cutting tiles to fit these areas might seem tricky, but with the right tools and techniques, you can achieve a clean, professional look.
Tools for Cutting Tiles
- Tile Cutter: Ideal for straight cuts. A manual tile cutter scores the tile and then snaps it along the scored line.
- Wet Saw: Best for precise cuts and thicker tiles. It uses a diamond blade cooled by water to prevent overheating.
- Snap Cutter: Useful for quick, straight cuts. It works similarly to a tile cutter but is often easier to use.
- Nippers: Perfect for small, intricate cuts. Nippers can break off small pieces of tile, making them ideal for curved cuts.
Making Straight Cuts
- Measure and Mark: Measure the space where the tile will fit and mark the cut line on the tile with a pencil.
- Using a Tile Cutter: Place the tile in the cutter, align the mark with the scoring wheel, and make one firm stroke to score it. Then, snap the tile along the scored line.
- Using a Wet Saw: Align the tile with the saw blade and slowly push it through, keeping your hands clear of the blade.
Cutting Curved or Scribed Cuts
- Mark the Curve: Use a template or trace the outline of the area onto the tile.
- Parallel Slices with Wet Saw: Make several parallel cuts into the waste area up to the marked line. These cuts will create “fingers” that can be easily broken off.
- Using Nippers: Carefully break off the fingers and use the nippers to trim any remaining pieces, following the curve closely.
Tips for a Clean Finish
- Smooth Edges: Use a rubbing stone or sandpaper to smooth any rough edges after cutting.
- Take Your Time: For intricate cuts, work slowly and carefully to avoid breaking the tile.
- Check Fit: Always dry-fit the cut tiles before applying mortar to ensure they fit perfectly.

By mastering these cutting techniques, you can ensure that every tile fits perfectly, even around tricky corners and edges. Next, we’ll dive into Grouting the Tile Joints, the final step to secure and finish your kitchen floor.
Grouting the Tile Joints
Grouting is the final step in tiling kitchen floors. It secures the tiles and gives your floor a finished look. Let’s walk through the process of mixing grout, applying it, and cleaning up any excess.
Mixing Grout
Grout comes in various types, but the most common for kitchen floors is sanded grout. Here’s how to mix it:
- Read Instructions: Always follow the manufacturer’s instructions on the grout package.
- Measure Water: Use a measuring cup to add the recommended amount of water to a clean bucket.
- Add Grout Powder: Slowly add the grout powder to the water while stirring continuously to avoid lumps.
- Mix to Consistency: Mix until you achieve a looser-than-mayonnaise consistency. If it’s too thick, add a little more water. If too runny, add more grout powder.
- Let it Slake: Allow the mixture to sit for about 10 minutes, then stir it again before use.
Applying Grout
Once your grout is mixed, it’s time to apply it to the tile joints:
- Scoop Grout: Use a rubber float to scoop a trowelful of grout.
- Spread Grout: Hold the float at a 45-degree angle and spread the grout over the tiles, pushing it into the joints. Move the float both in line with the joints and diagonally to ensure all gaps are filled.
- Remove Excess: Scrape off excess grout by holding the float nearly upright and moving it diagonally across the tiles. Do this only once or twice to avoid pulling grout out of the joints.
Cleaning Excess Grout
After applying the grout, it’s crucial to clean up any excess to prevent grout haze:
- Wait 30 Minutes: Allow the grout to set for about 30 minutes. It should be firm to the touch.
- Wipe with Sponge: Use a damp, well-squeezed sponge to wipe away the grout haze. Rinse the sponge frequently in clean water and change the water often.
- Repeat Wiping: Continue wiping until the tiles are clean. Be gentle to avoid removing grout from the joints.
Grout Haze
Grout haze is a thin film left on tiles after grouting. Here’s how to deal with it:
- Old T-Shirt or Cheesecloth: Use an old T-shirt or cheesecloth to buff away any remaining haze.
- Grout Haze Remover: If the haze persists, consider using a grout haze remover solution. Follow the product instructions carefully.
- Act Quickly: Try to remove all haze before it dries completely and becomes harder to remove.
By following these steps, you’ll ensure your grout is well-applied and your tiles are clean, leaving you with a beautiful, durable kitchen floor. Next, we’ll cover Sealing the Grout, an essential step to protect your work and keep it looking new.
Sealing the Grout
Sealing the grout is a crucial step in tiling kitchen floors. It protects the grout lines from stains, mold, and mildew, ensuring your floor remains beautiful and durable. Here’s how to do it:
Choosing a Grout Sealer
Grout sealers come in various forms, including sprays, applicator bottles, and brush-on options. Choose one that suits your needs. Some sealers even come with built-in applicators for easy use.
Tip: Use a sealer that is specifically designed for the type of grout you used.
Application
Applying grout sealer is straightforward but requires attention to detail:
- Wait for Curing: Allow the grout to cure for about three days before sealing. This ensures the grout is fully set.
- Clean the Surface: Make sure the grout lines are clean and dry before applying the sealer.
- Apply Sealer: Follow the manufacturer’s instructions for application. Typically, you will apply the sealer directly to the grout lines using the applicator. Be careful to avoid getting sealer on the tiles, especially if they are glazed.
- Wipe Excess: Wipe up any excess sealer within 10 minutes to prevent it from drying on the tile surface.
Tip: For glazed tiles, be extra careful to only seal the grout lines.
Curing Time
After applying the sealer, it’s important to let it cure properly:
- Follow Instructions: Check the sealer’s instructions for the recommended curing time. This can vary but usually takes about 24 hours.
- Avoid Water: Keep the area dry during the curing period to ensure the sealer sets correctly.
Maintenance
To keep your grout looking new, regular maintenance is key:
- Regular Cleaning: Use a non-acidic, antibacterial cleaner to clean your tiles and grout. This helps prevent stains and buildup.
- Check for Wear: Over time, grout sealer can wear off. A simple test is to drop water on the grout. If it soaks in, it’s time to reseal.
- Reapply Sealer: Expect to reapply grout sealer every one to two years, depending on the traffic and wear your kitchen floor experiences.
By sealing your grout, you protect your investment and maintain the beauty of your kitchen floor. Next, we’ll answer some Frequently Asked Questions about Tiling Kitchen Floors to help you with any additional queries you might have.
Frequently Asked Questions about Tiling Kitchen Floors
What is the 3/4/5 rule for tiling?
The 3/4/5 rule helps ensure your tiles are laid out squarely. Here’s how it works:
- Measure 3 feet along one wall and make a mark.
- Measure 4 feet along the adjacent wall and make another mark.
- The distance between these two marks should be exactly 5 feet if the corner is square.
This rule forms a right triangle, helping you keep your tiles straight and aligned.
Is tile a good option for kitchen floors?
Yes, tile is a great option for kitchen floors. Here’s why:
- Durability: Tiles like ceramic and porcelain are tough and can handle heavy foot traffic. They are also resistant to scratches and dents.
- Easy Maintenance: Tiles are easy to clean and maintain. Spills can be wiped up quickly, and regular sweeping keeps them looking new.
- Variety: Tiles come in many colors, patterns, and styles. Whether you want a modern look or something classic, there’s a tile for you.
Some users have mentioned that tile can be hard on your feet and legs, especially if you stand for long periods. However, cushioned mats can help with this.
What do you put under tile floor in kitchen?
Proper underlayment is crucial for a successful tile installation. Here’s what you might need:
- Cement Board: This provides a stable base for the tiles and helps prevent cracks.
- Plywood: If your subfloor is not even, a layer of plywood can help level it out.
- Crack Isolation Membrane: This is especially useful for concrete subfloors. It helps prevent cracks in the subfloor from transferring to the tiles.
- Thin-Set Mortar: This adhesive keeps your tiles in place. Make sure to mix it to the right consistency and spread it evenly.
Choosing the right underlayment ensures that your tile floor will be durable and long-lasting.
By understanding these key points, you’re well on your way to a beautiful and functional kitchen floor. Next, let’s wrap up with some final thoughts on the benefits of tiling your kitchen floor.
Conclusion
Tiling kitchen floors is a fantastic choice for both durability and aesthetics.
Durability is one of the biggest advantages of tile flooring. Ceramic, porcelain, and even natural stone tiles are incredibly tough and can withstand heavy foot traffic, spills, and the daily wear and tear that comes with a busy kitchen. Unlike hardwood, tile doesn’t scratch easily and won’t need refinishing. It’s also resistant to water and stains, making it a practical option for a kitchen environment.
Aesthetics are another major benefit. Tiles come in a wide variety of colors, shapes, sizes, and finishes. Whether you’re aiming for a modern, sleek look or a rustic, farmhouse style, there’s a tile that will suit your vision. Wood-look tiles, for instance, offer the charm of natural wood without the maintenance hassles. You can even mix and match different tiles to create a unique, custom design.
At Aqua Gleam Bathrooms, we pride ourselves on our high-quality workmanship and attention to detail. Our team of skilled professionals can help you choose the perfect tile for your kitchen and ensure it’s installed flawlessly. We understand that every home is unique, and we work closely with you to bring your vision to life.
So, if you’re considering a kitchen remodel or just want to upgrade your flooring, tiling is an excellent option. With its durability, easy maintenance, and endless design possibilities, tile flooring can transform your kitchen into a beautiful and functional space. Contact Aqua Gleam Bathrooms today to start your kitchen change journey.