
Why Fixing a Leaky Kitchen Faucet is Important
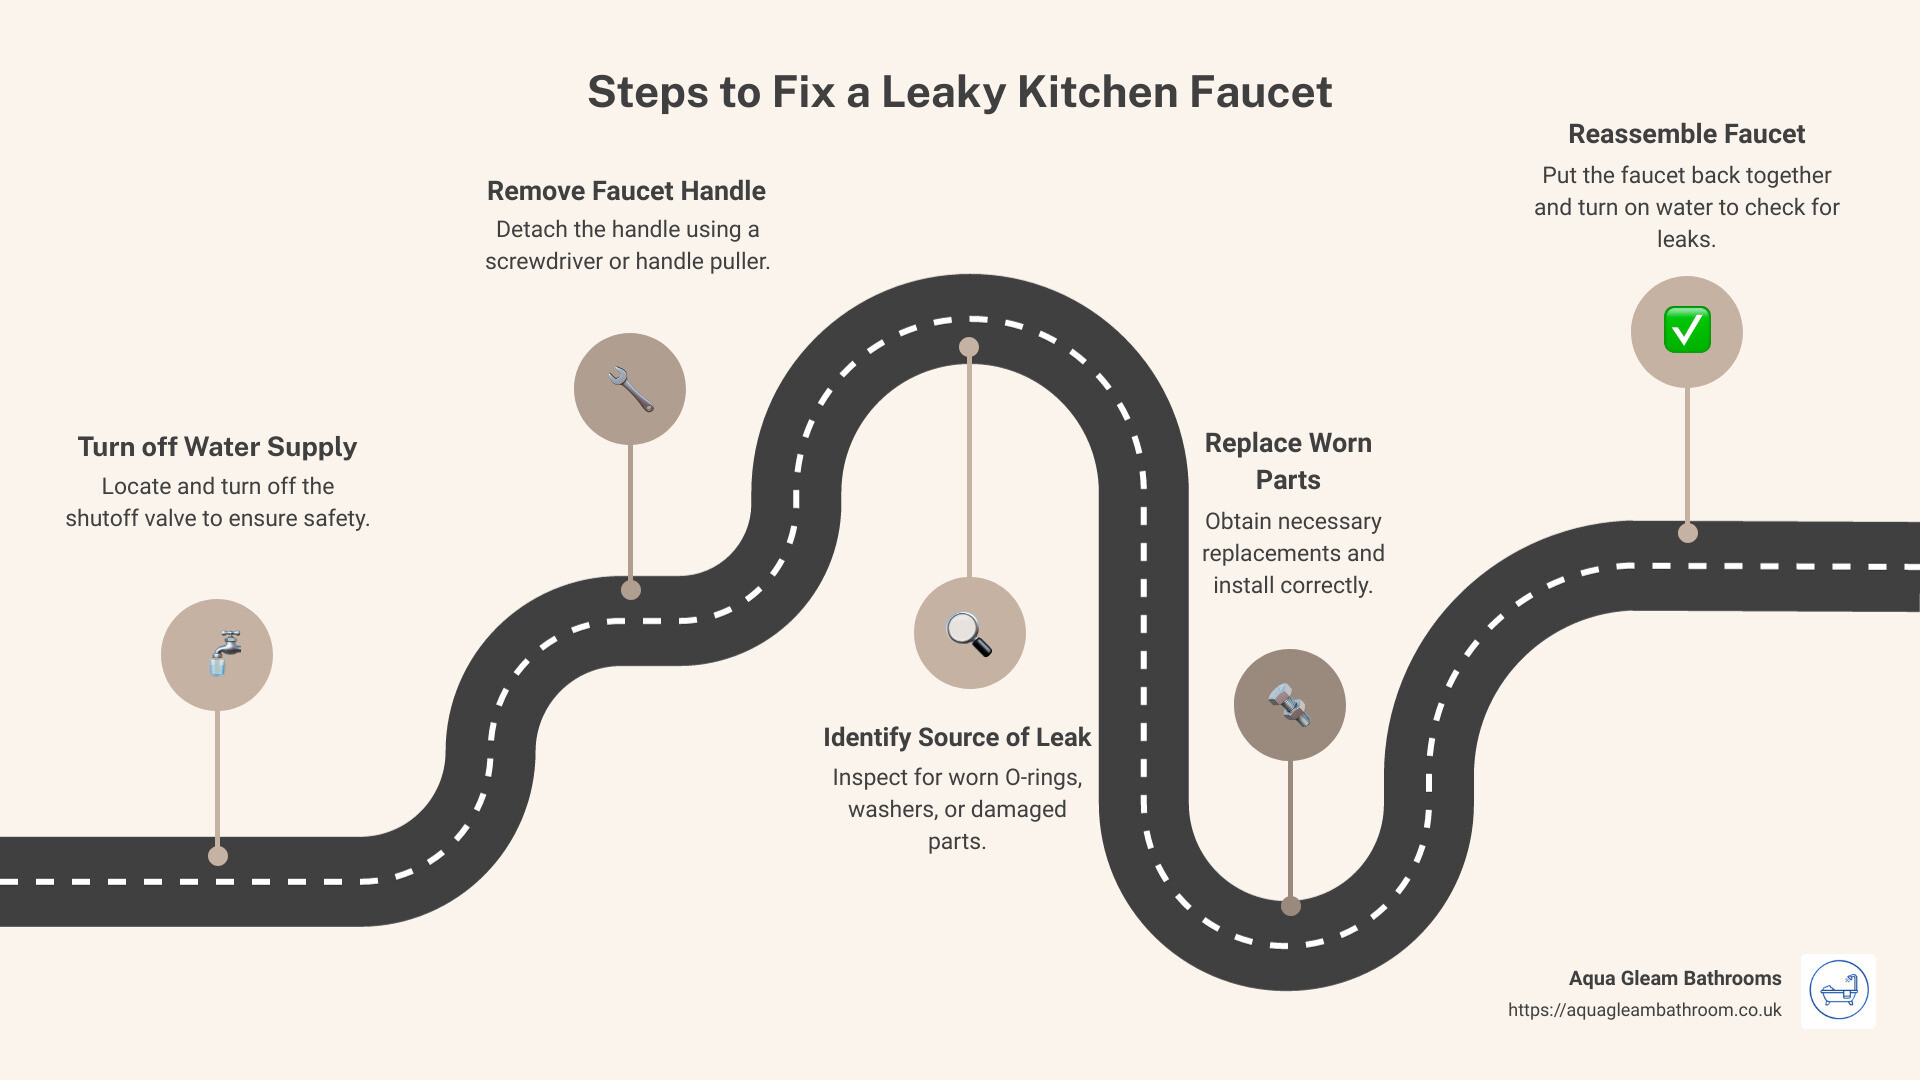
How to repair a leaking kitchen faucet: This common household task can save water, reduce bills, and prevent further damage. Here’s a quick overview of what to do:
- Turn off the water supply.
- Remove the faucet handle.
- Identify the source of the leak.
- Replace worn or broken parts.
- Reassemble and check for leaks.
A leaky kitchen faucet—that incessant drip—can be more than just annoying. It can waste gallons of water and drive up your utility bills. Understanding how to repair a leaking kitchen faucet can save homeowners both time and money, while also conserving water.
Regular maintenance and timely fixes can extend the life of your faucet, keeping your kitchen in top shape. Additionally, tackling this DIY project can be rewarding, providing a sense of accomplishment and self-reliance.
It’s essential to address even small leaks promptly to avoid major damage over time. By following a few straightforward steps, you can restore your faucet to perfect working condition.
Tools and Materials Needed
Before you start fixing your leaking kitchen faucet, gather all the necessary tools and materials. Having everything ready will make the process smoother and faster. Here’s what you’ll need:
Tools Required
- 4-in-1 Screwdriver: This versatile tool will help you handle various screws on your faucet.
- Allen Wrench: Essential for removing the faucet handle. It’s best to have a set of small Allen wrenches to cover different sizes.
- Pliers: Regular pliers and slip-joint pliers will help you grip and turn parts.
- Crescent Wrench: Useful for loosening and tightening nuts and bolts.
- Adjustable Wrench: Handy for various sizes of nuts and bolts.
- Needle-nose Pliers: Perfect for removing small retaining clips.
Materials Required
- Faucet Repair Kit: This kit usually includes all the necessary parts like O-rings, seats, and springs.
- O-ring Seals: These are critical for preventing leaks around the spout and handle.
- Plumber’s Grease: Helps lubricate the parts, making reassembly easier and ensuring a good seal.
- Duct Tape: Useful for protecting surfaces and securing parts temporarily.
- Distilled White Vinegar: Effective for cleaning mineral deposits off faucet parts.
- Scouring Pad: Helps scrub away tough buildup without damaging the faucet components.
- Washers: Essential for replacing worn-out washers that cause leaks.
Faucet Repair Kit
A faucet repair kit is a convenient option because it includes all the necessary parts, such as the ball, springs, seats, and O-rings, along with a small repair tool. This kit ensures you have everything you need for almost any repair, saving you multiple trips to the hardware store.
O-ring Seals
O-ring seals are small but essential components that prevent water from leaking around the faucet handle and spout. Over time, they can wear out and cause leaks. Replacing them is a key step in fixing a leaking faucet.
Allen Wrench
An Allen wrench is crucial for removing the faucet handle. Most single-lever faucets have a small setscrew that holds the handle in place. Having a set of Allen wrenches ensures you’re prepared for different sizes.
Pliers
Both regular and slip-joint pliers are needed for gripping and turning various parts of the faucet. They’re especially useful for removing the cap and other components.
Screwdriver
A 4-in-1 screwdriver is versatile and can handle different types of screws you may encounter during the repair.
Plumber’s Grease
Applying plumber’s grease to O-rings and other parts helps ensure a smooth reassembly and a tight seal, preventing future leaks.

Having these tools and materials on hand will make the repair process efficient and stress-free. Once you have everything ready, you can move on to shutting off the water supply and beginning the repair.
Step-by-Step Guide on How to Repair a Leaking Kitchen Faucet
Shut Off the Water Supply
Before you start fixing your faucet, turn off the water supply. This prevents accidental water flow and keeps your work area dry. Locate the shutoff valve under the sink and turn it off. Pro tip: Open the faucet to make sure the water is completely off.
Remove the Faucet Handle
Next, you need to remove the faucet handle to access the internal parts. To do this:
- Pry off the decorative cap on the handle.
- Use a screwdriver to remove the screw underneath.
- Gently lift off the handle. If it’s stuck, use a handle puller or tap gently.
Identify the Source of the Leak
With the handle removed, inspect the internal components. Look for:
- O-rings: Check for cracks or misshaping.
- Washers: Look for wear or damage.
- Other parts: Inspect for any signs of wear or corrosion.
Replace the Worn or Broken Parts
Once you’ve identified the faulty part, it’s time for a replacement:
- Take the worn part to a hardware store to find an exact match.
- Install the new part, ensuring it aligns correctly and seats properly.
Reassemble the Faucet
Finally, put everything back together:
- Place the handle back on the stem and secure it with the screw.
- Replace the decorative cap.
- Turn the water supply back on slowly and check for leaks.
Pro tip: If the leak persists, you may need to repeat the process or consult a professional.
Now that your kitchen faucet is fixed, let’s explore different types of faucets and specific repair instructions.
Types of Faucets and Specific Repair Instructions
Compression Faucets
Compression faucets have two handles—one for hot water and one for cold. Here’s how to fix them:
- Remove Decorative Caps: Pry off the decorative caps on each handle.
- Unscrew Handles: Use a screwdriver to remove the screws and lift off the handles.
- Remove Valve Stem: Use a wrench to unscrew the packing nut and then remove the valve stem.
- Replace Seat Washer: At the bottom of the stem, you’ll find a rubber washer. Replace it with a new one coated in plumber’s grease.
- Replace O-ring: If the leak is around the handle, replace the O-ring as well.
Reassemble the faucet by reversing these steps. Turn the water back on slowly to check for leaks.
Ball Faucets
Ball faucets are single-handle faucets often found in kitchens. They use a ball mechanism to control water flow and temperature.
- Remove Cap: Unscrew the decorative cap and remove the handle.
- Remove Cam and Seal: Use pliers to take off the cap, cam, and seal.
- Remove Inlet Seals and Springs: Use needle-nose pliers to remove the inlet seals and springs.
- Install New Parts: Replace the O-rings, springs, valve seats, and cam washers from a ball faucet repair kit.
Reassemble the faucet and turn the water back on slowly to check for leaks.
Cartridge Faucets
Cartridge faucets usually have one handle. They are easy to repair:
- Remove Handle: Unscrew the handle to access the cartridge.
- Remove Retaining Clip: If there’s a retaining clip, remove it with pliers.
- Remove Cartridge: Pull out the cartridge.
- Replace O-rings: Install new O-rings coated with plumber’s grease.
Reassemble the faucet and turn the water back on slowly to check for leaks.
Ceramic Disk Faucets
Ceramic disk faucets are durable but can leak if the seals wear out.
- Remove Escutcheon Cap: Unscrew the escutcheon cap to access the handle.
- Remove Handle and Disk Cylinder: Unscrew the handle and remove the disk cylinder to expose the neoprene seals.
- Clean or Replace Seals: Soak the seals in white vinegar if they are salvageable. Otherwise, replace them.
Reassemble the faucet. Turn the water on slowly to avoid cracking the ceramic disk.
Single-Handle Faucets
Single-handle faucets can use various mechanisms like ball, cartridge, or disk.
- Remove Handle: Unscrew the set screw and lift off the handle.
- Access Mechanism:
- Ball Type: Remove the cap and collar to access the ball assembly.
- Cartridge Type: Pull out the retaining clip and remove the cartridge.
- Disk Type: Unscrew and remove the disk cylinder.
- Check Components: Inspect O-rings, seals, and other parts for wear or damage.
- Replace Faulty Parts: Replace any faulty parts, such as the entire ball assembly, cartridge, or ceramic disks.
Reassemble the faucet and turn the water back on slowly to check for leaks.
Double-Handle Faucets (Non-Compression)
Double-handle faucets that aren’t compression types include cartridge and disk faucets.
- Remove Handles: Unscrew the set screws or remove the decorative caps and then unscrew.
- Access Mechanism:
- Compression Faucets: Remove the valve stem to access the washer.
- Cartridge or Disk Type: Remove the retaining nut or clip to access the cartridge or disk.
- Replace or Clean Parts: In cartridge or disk faucets, replace the cartridge or clean and inspect the ceramic disks.
Reassemble the faucet, turn on the water supply, and test each handle for leaks.
Common Causes of Leaky Faucet Handles
Leaky faucet handles are a common issue that can lead to water waste and higher bills. Understanding the root causes can help you fix the problem effectively. Here are some common reasons why faucet handles leak:
Worn-Out Washers
Washers are small rubber or silicone pieces that create a seal in the faucet. Over time, these washers wear out due to constant friction and water pressure. A worn-out washer can cause leaks around the handle.
Tip: Regularly inspect and replace washers to prevent leaks. It’s a simple fix that can save you a lot of trouble.
Damaged O-Rings
O-rings are rubber rings that seal the faucet spout and handle. They can crack or wear out over time, leading to leaks. Damaged O-rings are a frequent cause of leaks in cartridge and ball faucets.
Tip: O-rings are inexpensive and easy to replace. Always have a few spare ones on hand.
Faulty Seals
Seals are used in various parts of the faucet to prevent water from leaking. Over time, seals can become worn or damaged, especially in ceramic disk faucets. Faulty seals are often the culprit behind persistent leaks.
Tip: Inspect seals during regular maintenance and replace them if they show signs of wear.
Loose Parts
Faucet components like nuts, screws, and bolts can become loose over time due to usage and water pressure. Loose parts can cause leaks around the handle and base of the faucet.
Tip: Periodically check and tighten all the components of your faucet to keep it leak-free.
Water Pressure Variations
High water pressure can strain your faucet’s components, causing them to wear out faster. Conversely, sudden drops in water pressure can also lead to leaks as the internal components may not seat properly.
Tip: Use a pressure regulator to maintain a steady water pressure between 40 and 60 psi.
Age of Faucets
Older faucets are more prone to leaks due to the natural wear and tear of their components. If your faucet is over a decade old, it might be time to replace it.
Tip: Keep track of your faucet’s age and consider upgrading to a newer model if you frequently encounter leaks.
Understanding these common causes can help you effectively address and prevent leaky faucet handles. Regular maintenance and timely replacements are key to keeping your faucets in top condition.
Next, we’ll dive into Tips to Prevent Faucet Leaks, offering proactive measures to extend the life of your faucets and avoid leaks altogether.
Tips to Prevent Faucet Leaks
Maintaining a leak-free faucet is crucial for both water conservation and the longevity of your plumbing fixtures. Here are some practical tips to help you keep your faucet in top shape.
Regular Inspection
Regularly inspect your faucets every three to six months. Look for early signs of wear and tear, such as drips, unusual noises, or corrosion. Check under the sink for any leaks as well. Early detection can save you from bigger problems later.
Cleaning and Care
Regular cleaning can prevent mineral and grime buildup, which can cause leaks. Use a gentle cleaner and a soft cloth. Avoid harsh chemicals that can damage your faucet’s finish. For tougher deposits, use mild soap and water or vinegar. Also, periodically clean the aerator to ensure a steady water flow.
Tighten Loose Parts
Loose nuts or screws can cause leaks. Tightening these components can often fix the problem. Small parts like washers and O-rings wear out over time, so replace them as soon as you notice wear.
Manage Water Pressure
High water pressure can strain your plumbing. Ideally, your water pressure should be between 40 and 60 psi. If your water pressure is consistently high, consider installing a pressure regulator. Sudden changes in water temperature can also stress your plumbing, so moderate and steady temperature settings are preferable.
By following these tips, you can extend the life of your faucets and prevent leaks. Regular maintenance is key to keeping your plumbing in top condition.
Next, we’ll answer some Frequently Asked Questions about How to Repair a Leaking Kitchen Faucet to help you tackle common issues effectively.
Frequently Asked Questions about How to Repair a Leaking Kitchen Faucet
How to stop a kitchen faucet from dripping?
One of the most common causes of a dripping faucet is worn-out O-rings. These small, rubber rings can wear out over time, causing leaks. To fix this, you’ll need to replace the O-rings.
First, turn off the water supply. Next, remove the faucet handle using an Allen wrench or screwdriver. Locate the O-rings and replace them with new ones from a faucet repair kit.
Pro Tip: Apply plumber’s grease to the new O-rings before installing them to ensure a snug fit and prevent future leaks.
Why is the bottom of my kitchen faucet leaking water?
A leak at the bottom of the faucet often points to issues with the aerator or the cartridge.
The aerator is the small screen at the end of your faucet. Mineral buildup can clog it, causing leaks. To clean it, unscrew the aerator, soak it in vinegar, and scrub off any debris.
If the aerator isn’t the issue, the cartridge might be the culprit. The cartridge controls the flow of water and can wear out over time. To replace it, turn off the water supply, remove the faucet handle, and pull out the old cartridge. Install a new cartridge, ensuring it is aligned correctly.
How to fix a leaky faucet single handle?
Fixing a single-handle faucet involves several steps, depending on the faucet type (ball, cartridge, or ceramic disk). Here’s a general guide:
- Handle Removal: Start by turning off the water supply. Use an Allen wrench or screwdriver to remove the handle.
- Mechanism Access: Depending on the faucet type, you may need to remove a cap or collar to access the internal mechanism.
- Inspect O-rings and Seals: Check the O-rings and seals for wear and tear. Replace any damaged parts.
- Ball Assembly: If you have a ball-type faucet, inspect the ball assembly. Replace any worn-out parts like the cam and seal or springs.
- Cartridge: For cartridge faucets, remove the old cartridge and install a new one. Ensure it is properly aligned.
- Ceramic Disks: If you have a ceramic disk faucet, remove the escutcheon cap and clean the disks with vinegar. Replace any cracked disks.
After reassembling the faucet, turn the water supply back on and check for leaks.
Pro Tip: Always keep a faucet repair kit handy. It contains all the essential parts for quick fixes.
Following these steps can help you fix a leaky kitchen faucet efficiently. If you encounter any issues, consider consulting a professional for assistance.
Conclusion
Repairing a leaking kitchen faucet can save you a lot of water and money. By following our step-by-step guide, you can handle most common faucet issues on your own. Regular inspections and maintenance can prevent leaks and extend the life of your faucet.
However, sometimes DIY fixes aren’t enough. If the problem persists or if you’re unsure about the repair, don’t hesitate to seek professional help. At Aqua Gleam Bathrooms, we pride ourselves on our high-quality workmanship and professional service.
Water conservation is another crucial reason to fix leaks promptly. A small drip might seem harmless, but it can waste a significant amount of water over time. By repairing leaks quickly, you contribute to water conservation efforts and reduce your utility bills.
If you need help with more complex issues or want to upgrade to luxury kitchen fittings, Aqua Gleam Bathrooms is here to assist. Our team of experts ensures that all installations meet the highest standards. From designing custom kitchens to providing professional repair services, we cover it all.
Visit our Custom Kitchen Design Services page to learn more about our offerings and how we can help you create the kitchen of your dreams.
Taking care of your kitchen faucet not only prevents leaks but also ensures a well-functioning and beautiful kitchen space. Trust Aqua Gleam Bathrooms for all your kitchen and bathroom needs.