

Introduction
Curbless Showers, Concrete Slab
When considering a curbless shower installation on a concrete slab, knowing how to effectively waterproof the area is crucial. For those searching for a quick guide on waterproofing a curbless shower on concrete, here’s what you need to know:
- Preparation is key: Ensure the concrete is clean and primed.
- Use the right materials: Penetrating sealers, liquid rubber, or membrane systems like Kerdi or Redguard are effective waterproofing options.
- Pay attention to detail: Proper slope to the drain, joint sealing, and installation techniques are vital for preventing leaks.
- Consider professional help: Due to the complexity, hiring experts like Aqua Gleam Bathrooms ensures high-quality workmanship and peace of mind.
A curbless shower offers a sleek, modern look and is accessible for all ages and abilities. However, it requires careful planning and execution to ensure it’s properly waterproofed, especially when installed on a concrete slab. This type of project can transform a bathroom but comes with unique challenges like ensuring the right slope for drainage and selecting the best waterproofing method. Whether you’re a seasoned DIY enthusiast or considering hiring professionals, understanding the basics of waterproofing is the first step to a successful curbless shower project.
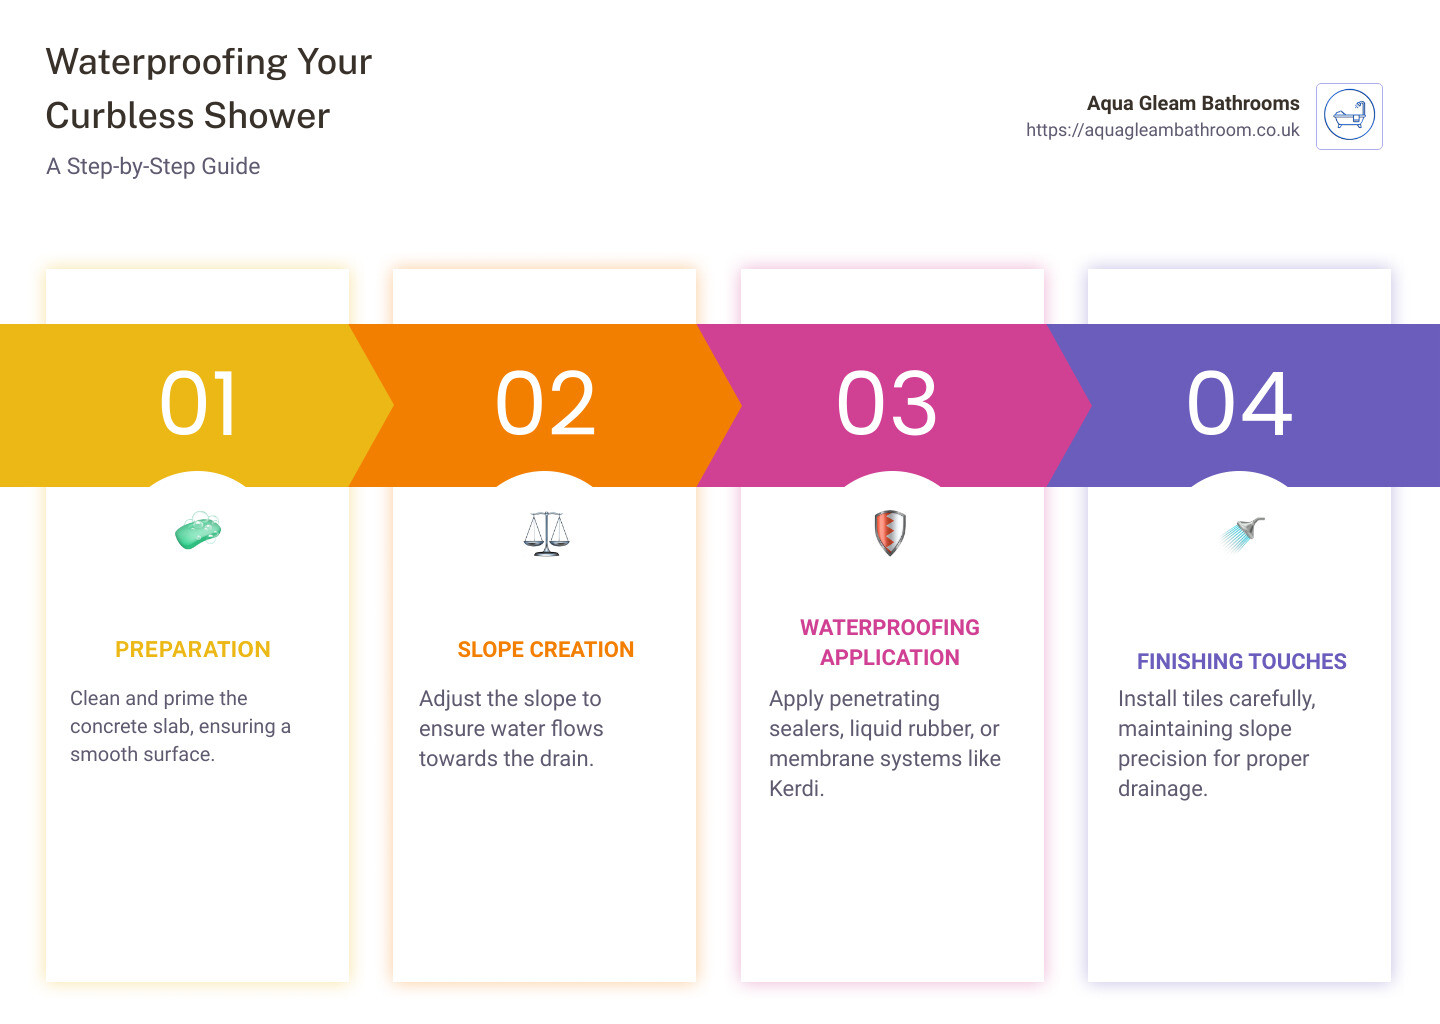
The infographic detailed above simplifies the waterproofing process for a curbless shower on a concrete slab, starting from preparation, through to the selection and application of waterproofing materials, and finishing with key installation tips. With the right approach, your curbless shower will not only look fantastic but also remain leak-free and durable for years to come.
Understanding Waterproofing Basics
When it comes to creating a curbless shower on a concrete slab, understanding the basics of waterproofing is crucial. This isn’t just about keeping water where it’s supposed to be; it’s about protecting your home from potential water damage, mold, and mildew. Let’s dive into the importance of waterproofing and explore the methods available to achieve a watertight shower area.
Why Waterproofing Matters
Imagine stepping into your beautifully designed curbless shower, only to find out later that water is seeping into areas it shouldn’t. Not only can this lead to costly repairs, but it also poses health risks due to mold growth. Waterproofing your curbless shower is essential for:
- Preventing water damage: Proper waterproofing keeps water in the shower area, protecting the rest of your bathroom and home from moisture intrusion.
- Maintaining structural integrity: Water seepage can weaken the concrete slab and surrounding structures, leading to serious issues down the line.
- Avoiding health risks: Mold and mildew thrive in damp environments. Waterproofing your shower helps keep these unwanted guests at bay.
Waterproofing Methods
There are several methods to waterproof a curbless shower on a concrete slab, each with its own set of advantages. Here’s a brief overview:
-
Penetrating Sealers: These products, like Siloxa-Tek 8500, penetrate the concrete surface to create a water-repellent barrier. They are ideal for providing a natural finish while protecting the concrete from within.
-
Liquid Rubber Application: Liquid rubber forms a flexible, seamless barrier over the concrete slab. It’s excellent for creating a custom-fit waterproof layer that adapts to the unique shape of your curbless shower.
-
Membrane Installation: Waterproofing membranes, such as the Kerdi membrane or Redguard, offer a robust solution. These membranes are applied over the concrete slab, forming a protective layer that water cannot penetrate. They are especially effective when used in conjunction with joint sealing techniques to ensure a completely watertight area.
Each of these methods has its place in waterproofing a curbless shower. The key is to choose the one that best fits your specific needs and to apply it correctly. The goal is to create a barrier that water cannot cross, keeping your shower and home dry and safe.
We’ll dive deeper into the preparation of the concrete slab, the specifics of each waterproofing method, and tips for achieving a seamless finish. By the end of this guide, you’ll be equipped with the knowledge to waterproof your curbless shower effectively, ensuring it remains a source of relaxation and enjoyment for years to come.
Preparing the Concrete Slab
Before diving into the waterproofing process, it’s crucial to ensure your concrete slab is ready. This preparation is the foundation of a successful curbless shower installation. Let’s break down the essential steps: Cleaning, Priming, and Slope to Drain.
Cleaning
The concrete slab must be spotless. Any dirt, grease, or previous coatings can interfere with the adhesion of waterproofing materials. Use a degreaser and a stiff brush to scrub the surface thoroughly. After scrubbing, rinse the area with water and let it dry completely. This might seem like a simple step, but it’s vital for ensuring the long-term effectiveness of the waterproofing.
Priming
Priming the concrete slab is next. This step is about preparing the surface to bond better with the waterproofing materials. Not all waterproofing methods require a primer, but when they do, it’s crucial not to skip this step. For example, if you’re using a liquid rubber application, the manufacturer might recommend a specific primer to ensure optimal adhesion. Follow the product instructions carefully.
Slope to Drain
Creating a slope to drain is perhaps the most critical step in preparing your curbless shower on a concrete slab. Proper drainage is essential to prevent water from pooling on the shower floor. The slope should lead water directly to the drain, ensuring a quick and efficient exit path. The standard recommendation is a quarter inch of slope per foot of shower space. Achieving this might require adding a layer of mortar to the concrete slab to create the slope. It’s a delicate process, as the slope must be consistent and smooth to prevent any areas where water might collect.
Remember: The key to a successful curbless shower waterproofing project lies in meticulous preparation. Each step, from cleaning to creating the right slope for drainage, plays a crucial role in ensuring the longevity and effectiveness of the waterproofing system. Skipping or rushing through these steps can lead to water damage and costly repairs down the line.
We’ll explore the different waterproofing options available for curbless showers. Each method has its advantages and considerations, so it’s important to choose the one that best fits your needs and skill level. Whether you opt for penetrating sealers, liquid rubber applications, or membrane installation, the goal remains the same: to create a watertight barrier that protects your home and keeps your curbless shower looking great for years to come.
Waterproofing Options for Curbless Showers
When considering how to waterproof a curbless shower on a concrete slab, there are several effective methods to ensure a watertight barrier. Each method has its own set of strengths, and it’s crucial to select the one that aligns with your project’s specific requirements and your comfort level with the application process.
Penetrating Sealers
One effective method is using penetrating sealers. A popular choice is Siloxa-Tek 8500. This sealer works by penetrating the concrete surface to provide a natural finish that doesn’t alter the appearance of your concrete. It’s especially useful for those who appreciate the raw, industrial look of concrete but need to ensure it’s fully protected against water infiltration.
Penetrating sealers are ideal for concrete slabs because they:
– Protect without changing the slab’s look.
– Prevent water from seeping through.
– Are easy to apply.
Liquid Rubber Application
Another waterproofing approach is the application of liquid rubber. This method involves creating a bonding layer on the concrete that acts as a barrier against water. Liquid rubber is particularly effective because it:
– Forms a seamless barrier that water can’t penetrate.
– Adheres well to various surfaces, including concrete.
– Is flexible, accommodating slight movements in the concrete without cracking.
Membrane Installation
For those seeking a more robust solution, installing a waterproofing membrane like Kerdi Membrane or Redguard offers an excellent level of protection. These membranes are applied over the concrete slab, creating a waterproof layer that’s particularly effective in high-moisture areas like showers.
Membrane installation involves:
– Laying down the Kerdi Membrane or applying Redguard to create a uniform barrier.
– Sealing joints meticulously to prevent any water leakage.
– Ensuring the entire area is covered, with extra attention to corners and edges where water might infiltrate.
When installing a waterproofing membrane, it’s vital to:
– Follow the manufacturer’s instructions carefully to ensure optimal performance.
– Cover the entire surface area, leaving no part exposed.
– Seal all joints and edges to prevent water from finding a way through.
Each of these waterproofing options offers a reliable solution for protecting a curbless shower on a concrete slab from water damage. The choice between penetrating sealers, liquid rubber, and membrane installation depends on your specific needs, the desired finish, and your level of DIY skill. Regardless of the method chosen, proper application is key to achieving a waterproof and durable shower area that stands the test of time.
In the next section, we’ll dive into installation tips for achieving a seamless finish, ensuring your curbless shower not only functions well but also looks great.
Installation Tips for a Seamless Finish
Creating a curbless shower on a concrete slab that is both functional and visually appealing requires attention to detail in every step of the installation process. From Tile Selection to Mortar Bed Construction and Slope Precision, each aspect plays a critical role in ensuring proper drainage and a polished look. Let’s explore how to achieve a seamless finish in your curbless shower installation.
Tile Selection
Choosing the right tile for your curbless shower can significantly impact its overall appearance and functionality. For a Seamless Look, Small Tile options are recommended. Small tiles, such as mosaic tiles, are more adaptable to the subtle slopes of a curbless shower floor, ensuring safer and more efficient water drainage. Additionally, small tiles offer more grout lines, which provide better grip underfoot, reducing the risk of slips in the wet environment of the shower.
Mortar Bed Construction
The Mortar Bed is the foundation of your curbless shower floor. It’s essential to get this right to ensure proper drainage and to prevent water from pooling. Pouring and Sloping the mortar bed correctly is crucial. Start by pouring a mortar mix onto the prepared and primed concrete slab. Then, carefully slope the mortar bed towards the drain. The slope should be subtle but effective, generally aiming for a quarter inch per foot drop towards the drain. This slope ensures that water flows directly into the drain without pooling on the shower floor.
Slope Precision
Ensuring Proper Drainage in a curbless shower is paramount. The precision of the slope in your mortar bed and tile layout directly impacts the shower’s ability to drain water efficiently. After the mortar bed has been poured and sloped, double-check the slope with a level before it sets. Any adjustments needed should be made promptly to ensure the correct slope is maintained. Even a slight miscalculation can lead to water pooling or flowing in unwanted directions, so take your time to get this step right.
In conclusion, achieving a seamless finish in a curbless shower on a concrete slab requires careful selection of tiles, meticulous construction of the mortar bed, and precise sloping to ensure efficient water drainage. By following these steps and paying close attention to detail, you can create a curbless shower that is not only waterproof but also beautifully integrates with the rest of your bathroom’s design.
Preventing Water Leakage
Preventing water leakage in a curbless shower on a concrete slab is crucial for maintaining the integrity of your bathroom and preventing potential water damage to your home. Two effective methods for achieving this are the installation of a Collapsible Rubber Threshold and the incorporation of a Water Dam.
Collapsible Rubber Threshold
A Collapsible Rubber Threshold serves as a flexible barrier at the entrance of your curbless shower. Unlike traditional shower thresholds, which may create a tripping hazard or interrupt the seamless look of a curbless design, collapsible rubber thresholds compress underfoot or when a wheelchair passes over them, then spring back to their original shape. This flexibility allows for easy access while effectively keeping water inside the shower area.
Installing a collapsible rubber threshold is straightforward:
- Measure the opening of your shower to determine the length of the threshold needed.
- Cut the threshold to size, if necessary, using a sharp utility knife.
- Apply a bead of silicone adhesive along the bottom edge of the threshold.
- Position the threshold at the shower entrance, pressing firmly to ensure a tight seal with the floor.
This simple addition can significantly reduce the risk of water escaping your curbless shower, protecting your bathroom floor from moisture damage.
Water Dam
A Water Dam is another effective solution for containing water within a curbless shower. Unlike the collapsible rubber threshold, a water dam is a small, silicone barrier that adheres directly to the shower floor, creating a lip that prevents water from spilling out. Water dams are particularly useful for showers that see a lot of water usage, as they provide an additional layer of protection against leakage.
To install a water dam, follow these steps:
- Clean the area where the dam will be placed, ensuring it is free of dust and debris.
- Dry-fit the dam to ensure it fits the space and meets your needs.
- Apply a silicone adhesive to the bottom of the dam.
- Place the dam on the shower floor, pressing down firmly to secure it in place.
- Seal the edges of the dam with silicone caulk to prevent water from seeping underneath.
Both the Collapsible Rubber Threshold and Water Dam are essential components in preventing water leakage in curbless showers on concrete slabs. By incorporating these elements into your shower design, you can enjoy the sleek, accessible look of a curbless shower without worrying about water damage or safety hazards.
We’ll address some of the most Frequently Asked Questions about Waterproofing Curbless Showers to help you better understand the process and ensure the longevity of your waterproofing efforts.
Frequently Asked Questions about Waterproofing Curbless Showers
When it comes to how to waterproof a curbless shower on a concrete slab, there are several questions that often come up. Let’s tackle them with simple, clear answers.
How do you ensure the waterproofing lasts?
Regular Maintenance: Just like any part of your home, keeping an eye on your shower and performing regular maintenance is key. This means checking for any signs of wear or damage and addressing them promptly.
Quality Materials: Use high-quality waterproofing materials and sealants. Products like Kerdi Membrane and Redguard are known for their durability and effectiveness. Choosing the right materials from the start can make a big difference in the long run.
Proper Installation: Ensure that the waterproofing is applied correctly. This includes making sure that the membrane covers all necessary areas and that there are no gaps or weak points. Following manufacturer instructions or hiring a professional can help ensure this.
Can you DIY waterproof a curbless shower on a concrete slab?
Yes, you can, but with caution. Waterproofing a curbless shower involves several steps that need to be done correctly to prevent leaks. If you’re comfortable with home improvement projects and follow instructions carefully, you can tackle this. However, if you’re unsure, it’s wise to consult with a professional. The cost of fixing a poorly waterproofed shower can be much higher than hiring a pro from the start.
What are the signs of a failing waterproofing system in a curbless shower?
Visible Leaks: The most obvious sign. If you see water in places it shouldn’t be, there’s likely a problem.
Mold and Mildew: These can indicate that moisture is getting where it shouldn’t. If you notice mold or mildew outside the shower area or a musty smell, it’s time to investigate.
Loose Tiles or Grout: Water can weaken the adhesive under tiles, causing them to become loose or for grout to crack. This can be a sign that water is penetrating behind your shower surfaces.
Peeling Paint or Wallpaper: If you notice peeling paint or wallpaper near your shower, it might be a sign that moisture is escaping from your curbless shower area.
Waterproofing a curbless shower on a concrete slab is a crucial step in ensuring the longevity and safety of your bathroom. By choosing the right materials, ensuring proper installation, and keeping an eye out for signs of trouble, you can enjoy the benefits of your curbless shower for years to come. When in doubt, consulting with a professional can save you time, money, and headaches down the road.
Conclusion
After walking through the steps on how to waterproof a curbless shower on concrete slab, it’s clear that achieving a waterproof and functional shower space requires attention to detail, the right materials, and the proper techniques. But, even with the best DIY guide, the quality of workmanship plays a crucial role in the success of your project. That’s where Aqua Gleam Bathrooms steps in.
At Aqua Gleam Bathrooms, we pride ourselves on our high-quality workmanship. Our team of experts brings years of experience and a keen eye for detail to every project. Whether it’s ensuring the seamless application of a waterproof membrane or achieving the perfect slope for water drainage, our professionals are equipped to handle every aspect of your curbless shower installation.
But why choose us? Here are a few reasons:
– Personalized Approach: Every project is unique, and we treat it as such. We work closely with our clients to ensure their vision comes to life, exactly how they imagined it.
– Comprehensive Services: From the initial consultation to the final touches, we offer a full range of services to make your bathroom renovation as smooth and stress-free as possible.
– Quality Assurance: We stand behind our work. With our commitment to using only the best materials and our meticulous attention to detail, you can rest assured that your curbless shower will not only look beautiful but also stand the test of time.
Waterproofing a curbless shower on a concrete slab may seem daunting, but with the right team by your side, it doesn’t have to be. Let us at Aqua Gleam Bathrooms take the worry and hassle out of the equation. With our expertise, your new curbless shower will not only enhance the beauty of your bathroom but also provide a safe, leak-free environment for you to enjoy for years to come.
Interested in learning more about how we can transform your bathroom? Visit our bathroom fitters Cardiff service page for more information and to get started on your project today. Let Aqua Gleam Bathrooms help you achieve the bathroom of your dreams with the quality and elegance you deserve.